Editing SQL Scripts
The SQL Commander contains an SQL editor, used to edit SQL scripts.
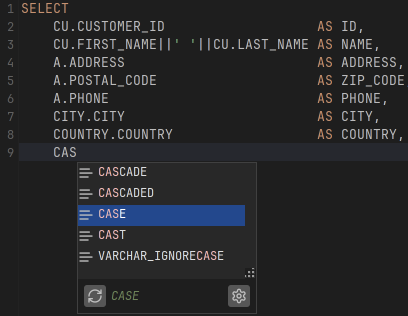
The editor area looks like this:

Above the editor is a toolbar with buttons related both to execution of scripts and to editing. The editing related buttons are covered below.
The left margin shows the line numbers.
Below the editor, you see a Status Bar with the following fields, from left to right:
- Position: the current caret position in the format:
<line>:<column> [<position from top>] </br>The last figure, within square brackets, is the caret position from the top. This can be useful when you get an error message executing a script that contains this information rather than a line/column location. - Insert/Overwrite Mode: INS if characters you type will be inserted at the caret position or OVR if they will overwrite the current text at the caret position. You can toggle this mode using the Toggle Typing Mode keyboard shortcut, by default bound to the Insert key.
- Macros: this field is only visible when working with macros, as described in the Recording and Playing Edit Macros section.
- File Format: the format of the file as detected when the file was loaded (if any). Click it to select which format to use when saving the file; Windows, Unix/Linux/macOS, or Old MacOS.
- Auto Commit Status: shows whether or not Auto Commit is enabled.
- Character Set: the character encoding as detected when the file was loaded (if any). Click it to select which encoding to use when saving the file.
- File: The name of the loaded file (if any). You can click on the filename to copy the file path or open the OS file chooser for the directory holding the file. If you just type into the editor without loading a file, the filename "Untitled" is shown instead. An asterisk (*) after the filename indicates that there are unsaved edits.
The SQL Editor is like any editor you're used to when it comes to typing, scrolling etc. But it also offers additional features to help you specifically with editing SQL scripts. These are described in the following sections.
You can change how to display in the Tools → Tool Properties dialog, in the General / Appearance category. This is explained in more detailed below.
Row Delimiter
This is how the SQL editor handles row delimiter:
- Linefeed (LF) is used as the line break between rows.
- Loaded files/texts are scanned for carriage return (CR) or carriage return, line feed (CRLF). The first found line break that is not a LF is set as the line break style for the document.
- Drop of a file to an existing document does not change the line break.
- Paste text do not change the line break.
- Copy text do not transfer the line break.
- The setting in the SQL Editor determines the line break used at next save.
- The setting in tool properties determines line break for new SQL Commanders (files).
In the editor status bar, the current line delimiter is shown. Click it to modify what line delimiter should be used at next save.

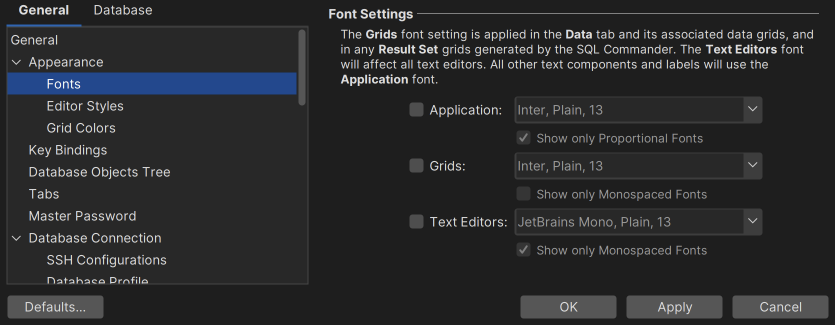
Font Settings
In the Appearance/Fonts category, you can select the font for Text Editors to control the font in the SQL Editor (Monospaced Fonts are recommended). The Grids settings controls which font to use in all result set grids while the Application font controls the rest of the user interface.
Zooming In the Editor
It is also possible to change the font size in individual editor tabs. To do so, press a modifier key as defined in Tools → Tool Properties and in the SQL Commander / Editor category, and use the mouse wheel or the scroll gesture on your trackpad. This gives the effect of zooming in and out on the contents of the current tab and can be especially handy when sharing your screen in a meeting or discussing with a colleague in front of the display. The font size can be different in different tabs and is not preserved between sessions.
Editor Styles
A script consists of keywords, operators, object identifiers, quoted text, comments, etc. To make it easier to distinguish these elements at a glance, the editor displays text using distinct font styles and colors based on its classification. For example, keywords default to a bold blue font, while quoted text appears in a regular green font.
To customize these colors and styles, navigate to Tools → Tool Properties and select the General / Appearance / Editor Styles category.

Editor Colors
The Editor Colors tab contains settings that control the structural colors used across the editor interface, such as the selection background, the caret (cursor) color, line highlights, and the default background.
Token Styles
The Token Styles tab allows you to customize the colors and font styles for different classifications of words (tokens) used in your scripts. These configurations adapt dynamically based on the file type; for instance, SQL highlighting and JSON highlighting maintain distinct token rules.
All specific language configurations are built upon a base Generic syntax definition. When you modify a specific token type to use a color or style that differs from its generic baseline, the token type's name is highlighted in the settings interface. You can click any highlighted token name to discard your overrides and revert to its inherited default value.
Column Guide
The Column Guide is an optional visual aid that renders as a thin vertical line at a specified column width. This helps you maintain consistent line lengths and is best utilized alongside monospaced fonts.
Comments
The editor uses the Tool Properties settings from the SQL Commander/Comments category under the General tab to detect comments.

Charsets and Fonts
You can also change the SQL Editor font family, which is useful and necessary in order to display characters for languages like Chinese, Japanese, etc., in Tool Properties in the Appearance/Fonts category to set the font for the SQL Editor (see Internationalization and Localization (i18N and L10N) for more information).

Loading and Saving Scripts
The SQL editor supports loading statements from a file and saving the content of the editor to a file. Use the standard file operations, Open, Save and Save As in the File main menu or the main toolbar to accomplish this. Loading a file loads it into a new SQL Commander tab or activates the tab that already holds it.
The name of the loaded file is listed in the status bar of the editor, with the full file path shown in the window title. The editor tracks any modifications and indicates changes with an asterisk (*) after the filename. When you close the SQL Commander tab or exit DbVisualizer, you are asked what to do if there are any pending edits that need to be saved.
The File → Open Recent submenu lists the recently loaded files. How many recent files to keep track of can be specified in the Tool Properties dialog, in the SQL Commander category under then General tab.
An alternative to locating editor tabs, Recent Files, Bookmarks or Monitors from the Files tab and History entries from the History window is to use the Quick Load feature, by default bound to the Ctrl+Alt+O key combination. It is also available via a main toolbar button as well as in the File → Quick File Open menu.
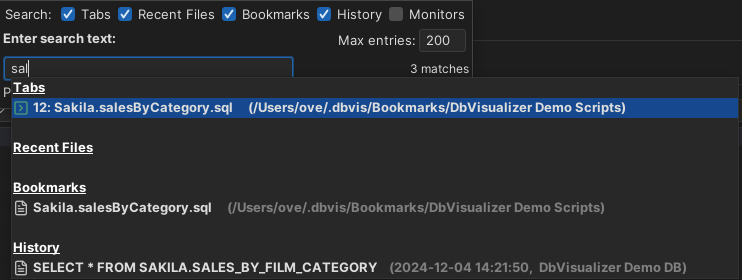
The Quick Load feature locates files with partly matching names from the categories you have selected, as you type. You can use an asterisk ("*") as a wildcard in the search string. Files already open in editor tabs is not displayed in Recent Files.
When you see the file you're looking for, just select it and press Enter to load it into an SQL Commander editor. If the file is already loaded in an editor, that tab is made visible instead.
The number of matches is shown on the search panel as seen on the figure above. It the number of matches is big, and you want to change the size, you can press Escape and change the number in the Max entries field that is shown. Go then to the Enter search text field and press arrow down. The result list shown will be limited to your set number for each category.
Stale Files Warning
SQL Commander monitors open files to detect external changes, for example if an open file is modified by an external editor, reloaded from a network connection or repository, etc. If a file is externally modified, you will see a warning ribbon at the top of the editor area, presenting options to handle the situation:

You can turn off this control in Tool Properties/SQL Commander:

This does not affect the check when you save the file; DbVisualizer will always check and warn if you're trying to save a file that was externally modified.
Drag and Drop a File
You can also select a file in the platform's file browser and drop it somewhere in the DbVisualizer window. If you drop it in an editor, the file content is inserted at the caret position in the editor. If you instead drop it in the toolbar area, the file is opened in a new SQL Commander tab.
Drag and Drop Database Objects
If you want to include an object shown in the database objects tree, you can select the node and drop it in the editor where you want it inserted. The Script Object dialog is shown where you can select exactly what you want to insert in the editor.

First of all, you can select to insert an SQL statement based on the dropped object, e.g. a SELECT statement or a CREATE statement. You can also choose to just insert the object name. The choices available depends on the type of object you drop.
In the Options area, you can opt to format the SQL before it is inserted and use qualifiers and quoted identifiers, and even change which statement delimiter to use.
The Output Destination is set to the SQL Commander tab you dropped the object on by default, but you can change your mind and pick another destination. If you stick with an SQL Commander as the destination, you can tell where in the editor to insert the text.
You can also open this dialog from the Databases tab, from the object's right-click menu.
If you just want to insert the object names in the editor, hold down the Ctrl key (or the Alt key on macOS) while dragging and dropping.
This behavior can be reversed in Tool Properties, in the SQL Commander category, so that dropping without pressing a key inserts the names and pressing the key launches the dialog."
Loading and Saving Bookmarks and Monitors
Bookmarks and Monitors are also files, but with special meaning. See the Managing Frequently Used SQL for how to create and edit them in the SQL Editor.
Navigating Between History Entries
When you execute a script, DbVisualizer saves it as a history entry, see the Re-Executing SQL Statements section for details. You can use the Previous and Next buttons in the editor toolbar to navigate between (load) these entries.

Navigating to Script Location
Clicking on the script filename in the right bottom corner of the editor brings up a menu that allows to copy the script's path (Copy Path), open the script's containing directory in the operating system's file browser (Open Enclosing Directory), or locate it in the Files tab (Show in Files).

Confirming Overwriting Unsaved Changes
By default, you have to confirm overwriting unsaved changes in an editor, e.g. when navigating between history entries, and when closing an SQL Commander tab with unsaved edits. You can disable these confirmation popups in the Tool Properties dialog, under the SQL Commander category under the General tab.
Find and Replace in the Editor
The Edit main menu and the editor right-click menu contains the Find (Ctrl+F) and Replace (Ctrl+R) actions.
Find shows a pane at top of the editor where you can enter what to look for, either as text, a regular expression or using wildcards. You can also limit the search to the current selection and use other options for a more precise search. Use Find Next and Find Previous to navigate to other matches, by default mapped to the F3 and Shift-F3 keys, or Down and Up keys.
Matches are highlighted while typing in the search field.
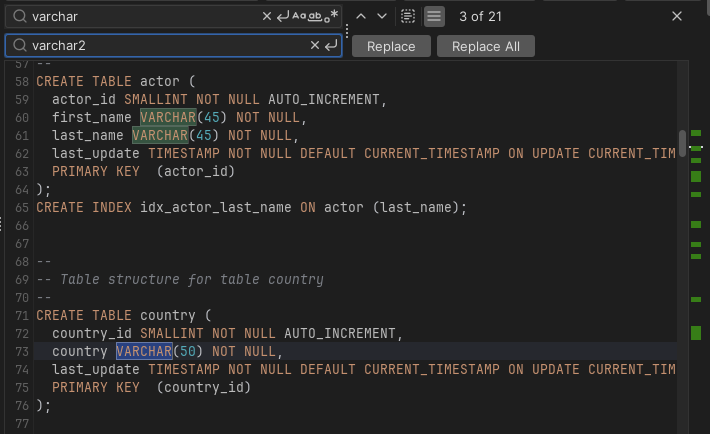
When in Replace mode, a second field is displayed used to enter the replacement text.
When you use a regular expression with group expressions in the Find what field, you can reference the captured text in the Replace with field using the dollar sign ($) plus the group number (e.g. $1 for the first group).
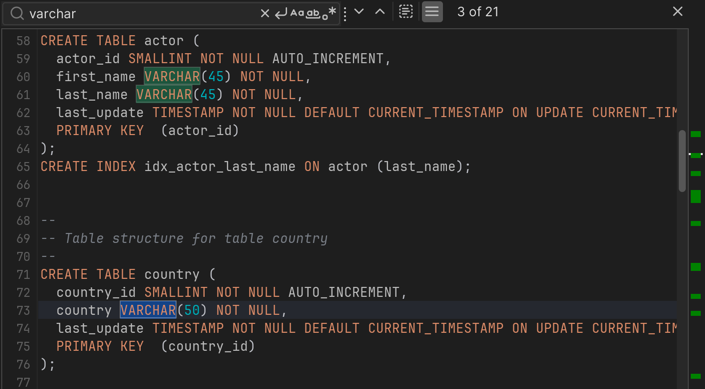
In the example below, we use regular expressions to qualify column names in the select list.
Text in editor:
SELECT
    firstname,
    lastname
FROM
    person;
Find what:
^(\s+)(\w+)(,?)$
Replace with:
$1person.$2$3
Deselect Match whole word, select Entire scope and Use Regular Expression.
When you click Find and choose All in the following dialog, you get the following result:
Resulting text:
SELECT
    person.firstname,
    person.lastname
FROM
    person;
Selecting SQL Statements
Select Current Statement, Select Next Statement and Select Previous Statement can be used to find individual statements in the editor. You find them in the submenu Selection of the right-click menu, or you can use the corresponding key bindings. 
SQL Formatting
Only in DbVisualizer Pro
This feature is only available in the DbVisualizer Pro edition.
Auto Completion
Auto completion is a convenient feature used to assist you when editing SQL statements and DbVisualizer commands. By default, you activate auto completion with the key binding Ctrl-SPACE, but you can also configure it to activate as you type (in the Tool Properties dialog, in the SQL Editor/Auto Completion category under the General tab).
With the caret placed anywhere in a statement, activating auto completion displays a list of keywords that match the letters you have typed so far. As you continue to type, the list narrows. The list of keywords is database specific, selected based on the database type for the connection currently selected in the Database Connection list above the editor.
With the caret placed where a table or view name may be typed in a supported SQL statement type, the auto completion list also shows a list of tables and views from the currently selected database connection, assuming you are actually connected to the database. When relevant, the popup may also show catalogs or schemas. The following figure shows the completion pop up with schemas, tables and keywords that contain the letters IL.

With the caret placed where a column name may be typed in a supported SQL statement type, the completion pop-up shows column names for the relevant tables. As a convenience when selecting from several tables, joinable columns are suggested as conditions.

DbVisualizer provides auto completion for the following DML commands: - SELECT - INSERT - UPDATE - DELETE
And the following DDL commands: - ALTER - DROP
Auto completion for DbVisualizer commands is very similar. Activating it after a partial command name lists all matching commands. If you activate it after a complete command name, you get a list of all valid parameters for the command. After a parameter name, you can select from a list of valid values.

For the @export set command, the parameter list is adapted for the specified output format after you have entered the Format parameter setting, for instance only showing parameters that are valid for the CSV format.

To display the completion pop-up, use the key binding Ctrl-SPACE (by default). You select an entry in the pop-up menu with a mouse double-click, the ENTER key, or the TAB key. To cancel the pop-up, press the ESC key.
If there are several SQL statements in the editor, make sure to separate them using the statement delimiter character (the default is ";").
In order for the column name completion pop-up to appear, you must first make sure there are table names in the statement. All names that have been listed in the completion popup are cached by DbVisualizer to make sure subsequent displays of the pop-up is performed quickly without asking the database. If you modify the schema (create or alter elements), the cache may need to be refreshed . The Database and Schema lists above the editor are used to limit the list of tables in the auto complete pop-up to those in the selected database and/or schema. It is possible to fine-tune how auto-completion works in the connection properties.
- Enable or disable the use of identifier qualifiers (i.e. qualifying table names with the schema name) in the [Database Type]/Qualifiers category. Ambiguous identifiers are automatically qualified.
- Enable or disable the use of delimited identifiers (e.g. quotes around a table name) in the [Database Type]/Delimited Identifiers category. Invalid or ambiguous identifiers are automatically delimited as necessary.
Sorting, when to show the popup, upper/lower case transformation, etc. can be configured in the Tool Properties dialog, in the SQL Editor/Auto Completion category under the General tab. Note that forcing case transformation may render invalid SQL; DbVisualizer will typically transform identifiers as expected by the connected database.
At the bottom of the auto-complete popup, you can see a preview of the text to be inserted, change the settings for auto-completion, and update the Metadata Cache to make the popup reflect recent changes.

Generating, Changing and Fixing Scripts Using the AI Assistant
Only in DbVisualizer Pro
This feature is only available in the DbVisualizer Pro edition.
If you have the AI Assistant enabled, you can use AI to help you generate, change and fix your scripts. When you invoke the Ask AI Assistant action in SQL Commander (using the keyboard shortcut, the toolbar, or the context menu), the query at cursor position and the active database connection will be included in the context of your inquiry.

Additionally, context actions specific to the current statement are available through a lightbulb icon in the left editor margin. Clicking this icon opens a context menu with quick options to optimize the syntax, ask a quick question, or fix an execution error.
Recording and Playing Edit Macros
If you repeatedly need to run a sequence of edit operation, you can record them as a macro and play it as many times as needed during an editing session. The editor status bar indicates when a recording is in progress and when a macro is available to play.
As an example, suppose you have some plain text that you need to convert into INSERT statements:
12345 123456
89012 890123
45678 456789
Place the caret at the beginning of the first line and start the macro recording, using the right-click menu or the corresponding key binding, and then type text and use key bindings to perform the following operations:
- Type
insert into mytable values(' - Insertion Point to Next Word
- Type
', - Insertion Point to Next Word
- Type
' - Insertion Point to Next Word
- Type
'); - Insertion Point Down
- Insertion Point to Beginning of Line
Then stop the recording. You now have a macro for converting a single line to an INSERT statement. To convert the remaining lines, just use Play Macro for each line. The result will look like this:
insert into mytable values('12345', '123456');
insert into mytable values('89012', '890123');
insert into mytable values('45678', '456789');
The Find operation, by default mapped to the Find key and Ctrl-F key stroke, can not be recorded. You must instead use Find Selection, Find with Dialog, Find Next and Find Previous. Mouse gestures are also not recorded, only key strokes and menu selections.
Folding
If you work with a large script containing many individual statements, it can sometimes be helpful to hide some. You can do so using the Folding feature. Folding → Toggle Folding in the right-click menu.
Here's an unfolded script with the statements visible:

Here is the same script with statements folded. Use the button in the row number area to expand/collapse a statement.

Highlighting Matches
Instead of searching for occurrences of a text string and navigating to each occurrence, it is sometimes useful to get all occurrences highlighted. To do this, select a text string that is at least three characters long and contains at least one letter or digit. You can use the Tool Properties dialog to enable or disable this feature (in the General / SQL Commander category) or change the colors used (in the General / Appearance / Editor Styles category).

Tab Key Treatment
Pressing the TAB key in the editor inserts eight (8) space characters by default. If you instead want a TAB character to be inserted, or want to insert another number of space characters, you can specify this in the Tool Properties dialog, in the General / SQL Commander category under the General tab.
Show Special Characters
Sometimes it is useful to render characters that are not visually represented such as whitespace, tab, newline, etc. To do this, make sure an SQL editor is active and then open the Edit meny and toggle Show Special Characters.
With Show Special Characters enabled:

Key Bindings
The editor shortcuts, or key bindings, can be redefined in the Tool Properties dialog, in the Key Bindings category under the General tab (see Changing Keyboard Shortcuts). Expand the Editor Commands node to manage all editor actions and the Main Menu/Edit node to manage the key bindings for the edit operations in the right-click editor menu and the main window Edit menu.
Vim Mode
SQL Commander offers a basic Vim mode, supporting a subset of navigation and editing commands from Vim. It covers the modal editing essentials:
- Modes: Normal, Insert, and Visual (character-wise and line-wise). A non-Vim selection (Select All, shift-arrows, mouse drag) is adopted into Visual mode.
- Navigation: all motions accept a numeric count, and the arrow keys, Home/End, and Page Up/Down work as expected.
- Character, word/WORD, and line motions (
h j k l,w b e ge,gg,G) - Screen motions (
H M L) and scrolling (Ctrl-F/B/D/U,zz/zt/zb) - Jump-to-match (
%) and in-line find (f F t T,;,,)
- Character, word/WORD, and line motions (
- Operators and text objects
- Operators
d,y,c,>,<composed with any motion - Text objects such as
iw/aw, quote and bracket pairs (i",a(,i{, …), and paragraphs (ip/ap)
- Operators
- Editing
x,D,C,Y,s,S,r,~,J, and paste (p/P)- Insert transitions (
i a I A o O,c{motion})
- Search:
/,?,n,N,*,#, integrated with the editor's find toolbar. - Undo, redo, and repeat:
u,Ctrl-R, and the repeat command (.), including text typed during an insert session.
Note that the following is not currently supported:
- Visual block mode
- Marks
- Macros
- Named registers
- Ex commands
- .vimrc configuration.
To enable Vim mode, open Tools → Tool Properties, and in the SQL Commander / Editor category, turn on the Enable Vim Mode setting.