intro
Unleash the power of Presto and DbVisualizer in our latest tutorial. Discover the distributed SQL query capabilities of Presto and leverage DbVisualizer's intuitive interface for seamless data exploration and optimization. Dive in now to unlock the full potential of the Presto-DbVisualizer connection!
Welcome to the exciting world of data-driven exploration! In today's fast-paced era, organizations grapple with the thrilling challenge of managing and deciphering enormous volumes of data spread across diverse systems. But fear not! With the right tools, you can unlock invaluable insights hidden within this data treasure trove.
Introducing PrestoDb often referred to as Presto, the mighty open-source distributed SQL query engine that empowers organizations to conquer mammoth datasets from multiple sources. Presto is like the ultimate data superhero, arming you with the strength to process and query data like never before.
But Presto doesn't work alone in this epic adventure. Enter DbVisualizer, the dynamic sidekick you've been waiting for! DbVisualizer is the caped crusader of database management and development tools, boasting a user-friendly interface and a comprehensive platform that supports various databases. It's like having a trusty companion that effortlessly connects you to Presto and other powerful data stores such as Hadoop, Cassandra, and MySQL.
In this exciting tutorial, we will embark on a quest to unleash the combined power of DbVisualizer and Presto. Prepare to be amazed as we navigate the data landscape together - we’ll be simplifying database exploration, constructing queries with ease, and even visualizing data like true data superheroes. By seamlessly integrating DbVisualizer with Presto, you'll unravel a trove of insights, weaving data from different sources into captivating charts, mesmerizing graphs, and dazzling dashboards.
Prerequisites
Presto Data Types
Presto supports a wide range of data types that are essential for accurate data representation and efficient query execution. Here are some commonly used Presto data types:
Using the right data types is crucial in Presto to ensure data accuracy and optimize query performance. Presto also provides data type conversion functions for transforming data between different types when needed.
Understanding Presto data types empowers you to accurately represent and manipulate your data, leading to more effective data querying and analysis.
Setting Up Presto
For this tutorial, we will be running Presto locally on a docker container. Follow these steps to install Presto on your docker container:
Step 1: Pull the Presto Docker Image
The Presto project provides the "Prestodb/Presto" Docker image, which includes the Presto server and a default configuration. Pull the image from the Docker Hub using the following command:
                    $
                    docker pull ahanaio/prestodb-sandbox
This command will download the latest version of the Presto Docker image.
Step 2: Run the Presto Container
Create a container from the Presto image using the following command:
                    $
                    docker run -p 8080:8080 --name presto ahanaio/prestodb-sandbox
This command creates a container named "presto" from the "ahanaio/prestodb-sandbox" image. The container runs in the background and maps the default Presto port, 8080, from inside the container to port 8080 on your workstation.
Step 3: Verify the Container
To verify that the Presto container is running, use the following command:
                    $
                    docker ps
This command displays all the running containers. Look for the "Presto" container and ensure that it is listed with the appropriate status and port mapping.
Step 4: Wait for Presto to Start
When the Presto container starts, it might take a few moments for it to become fully ready. You can check its status using the following command:
                    $
                    docker logs Presto
This command displays the container logs. Look for the "health: starting" status initially, and once it becomes ready, it should display "(healthy)".
Congratulations! You have successfully installed Presto on a Docker container. You can now access Presto by visiting http://localhost:8080 in your web browser and start running SQL queries against your Presto cluster.
Connecting To Presto in DbVisualizer
Creating a Presto connection in DbVisualizer is a straightforward process that allows you to unleash the power of Presto's distributed SQL query capabilities within the user-friendly environment of DbVisualizer. Here's how you can get started:
Now that we have a running Presto database in Docker, we can connect DbVisualizer to it by following the steps below:
1 - Go to the Connection tab. Click the "Create a Connection" button to create a new connection.

2 - Select your server type. For this tutorial, we will be choosing Presto as the driver.
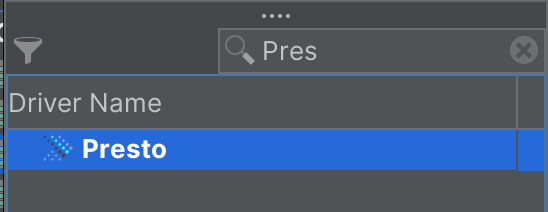
3 - Information. In the Driver Connection tab, enter the following information:
Database server: localhost
Database Port: 8080
UserId: “user”
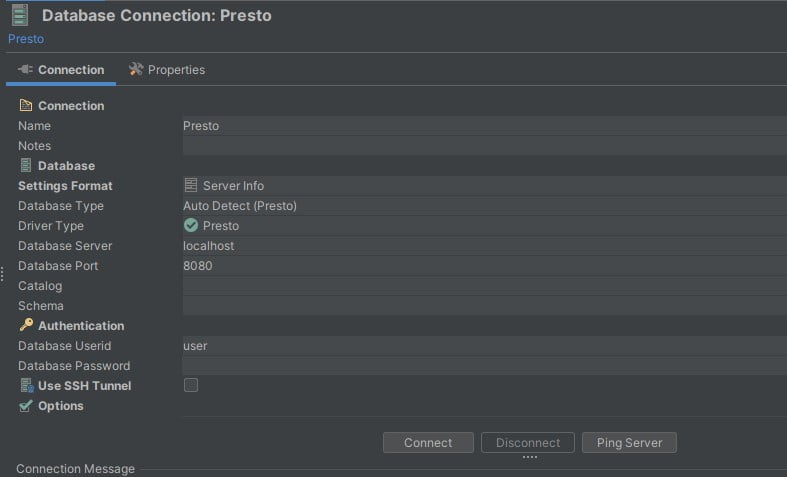
4 - Connecting. Click the "Connect" button to test the connection.
If you haven't updated your Presto driver, you will receive a prompt to do so.

Open the Driver Manager tab and update the driver to connect to your Presto database.

Click on “Connect” again to test your connection. If the connection is successful, you should see a message indicating that the connection was established. You can now browse the database using DbVisualizer.

5 - Explore and Query Presto Data
With the Presto connection established in DbVisualizer, you are now ready to explore and query your Presto data. Utilize DbVisualizer's intuitive interface, query builder, and visualization tools to interact with Presto and extract valuable insights from your distributed datasets.
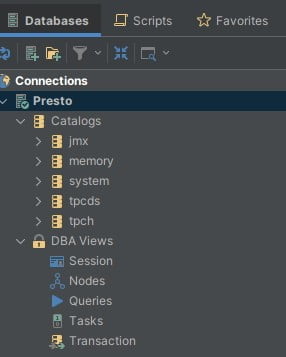
Executing Queries in DbVisualizer with Trino
DbVisualizer provides a powerful interface for writing and executing SQL queries against Trino. You can leverage its user-friendly query editor to compose SQL statements efficiently. Simply expand the Trino server tree, pick any catalog from the list, and create a SQL query commander by clicking on the play icon with a plus next to it.

You can start writing SQL queries in the SQL commander editor. A good query example is one to count the number of nations in the nation table:
                    1
                    select count(*) from tpch.sf1.nation;
Click on the play button above the SQL commander to execute the query. You would get the result as in the image below:

Leveraging Presto's Advanced Features through DbVisualizer
DbVisualizer provides a powerful platform for working with Presto, enabling you to unlock the full potential of Presto's advanced features. In this section, we will explore how DbVisualizer empowers you to work with Presto-specific functions and operators, optimize queries for improved performance, and harness Presto's distributed query capabilities.
Working with Presto-specific Functions and Operators in DbVisualizer
DbVisualizer offers seamless integration with Presto-specific functions and operators, allowing you to harness the full power of Presto's advanced SQL capabilities. These functions and operators are designed to handle complex data manipulations, transformations, and analysis tasks. With DbVisualizer, you can easily incorporate these functions into your queries and explore their potential.
Experimenting with the Presto’s GREATEST Function
Let's consider a scenario where you have a table in Presto that contains multiple numeric columns representing different measurements. You want to find the maximum value among these columns for each row. In DbVisualizer, you can experiment with the GREATEST function to achieve this.
                    1
                    SELECT GREATEST(column1, column2, column3) AS max_value


                    2
                    FROM your_table
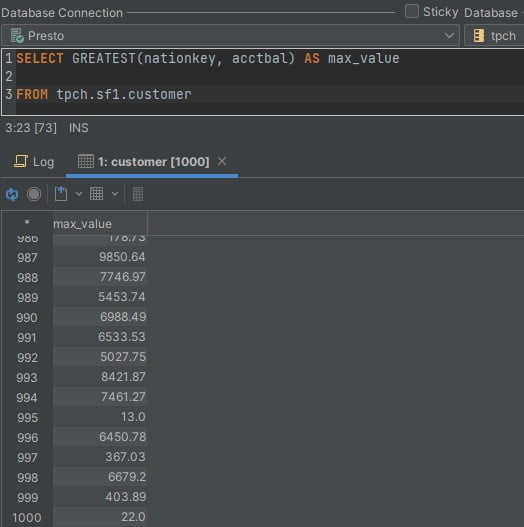
In this example, the GREATEST function is used to compare the values of the nationkey, and acctbal columns and retrieve the maximum value among them for each row. This allows you to identify the highest measurement value across multiple columns in your dataset.
By utilizing the SQL editor provided by DbVisualizer, you can easily modify and test different Presto-specific functions and operators. The Presto documentation provides a comprehensive list of available functions and operators along with usage examples.

If you are looking for an easy and powerful SQL client and database manager, then you've got to try DbVisualizer. It connects to nearly any database.
Exploring Presto's Distributed Query Capabilities with DbVisualizer
One of the amazing strengths of Presto is its ability to execute distributed queries across multiple data sources. And with DbVisualizer as your trusty companion, exploring Presto's distributed query capabilities becomes a breeze!
With DbVisualizer's intuitive interface, you can effortlessly connect to multiple data sources, including Presto. This means you can tap into Presto's federated query feature and analyze data from various systems all in one place. No more jumping between different tools or struggling with complex integrations!
Let's imagine a scenario where you have data stored in both Presto and MySQL databases. Using DbVisualizer's magic, you can create a single query that seamlessly joins data from these two sources. By connecting to both Presto and MySQL within DbVisualizer, you can construct a query that combines tables from both databases, taking advantage of Presto's distributed query capabilities. This allows you to perform powerful analytics and gain insights by joining data from disparate sources. To write a query like that you need to connect to the MySQL database in your Presto server.
Connecting to MySQL server In Presto
To connect to your MySQL database from Presto, you need to add your MySQL database as a catalog under your Presto server. To achieve this, follow the steps below:
                    $
                    docker exec -it presto /bin/bash
                    1
                    cd etc/catalog
                    $
                    touch mysql.properties
                    1
                    connector.name=mysql


                    2
                    connection-url=jdbc:mysql://localhost:3306


                    3
                    connection-user=root


                    4
                    connection-password=secret
You can have as many catalogs as you need, so if you have additional MySQL servers, simply add another properties file to etc/catalog with a different name (making sure it ends in .properties).

Running a Distributed Query with DbVisualizer
To seamlessly join data from both the MySQL database connection and Presto, you can use the following sample query:
                    1
                    SELECT table.column1, table.column2


                    2
                    FROM mysql.schema_name.table AS m


                    3
                    JOIN table.schema_name.table AS p


                    4
                    ON m.id = p.id

In this query, mysql.schema_name.table refers to the table in the MySQL database, and presto.schema.table refers to the table in the Presto catalog. Replace mysql.schema_name.table and presto.schema_name.table with the actual table names in your databases.
The JOIN keyword is used to combine the data from both sources based on a common column, represented by m.id = p.id. Adjust the join condition based on the specific columns you want to use for the join.
By executing this query, you can seamlessly retrieve data from both the MySQL database and Presto catalog, combining and analyzing information from multiple sources in a single query.
Conclusion
In this tutorial, we discovered the powerful integration of Presto and DbVisualizer for data querying and analysis. By connecting DbVisualizer to Presto, we unlocked advanced features, optimized query performance, and seamlessly joined data from multiple sources. Now, I encourage you to take the next step and try DbVisualizer today. Dive deeper into Presto using their documentation, experiment with functions, operators, and optimization techniques, and uncover valuable insights from your data. The possibilities are endless, so embrace the adventure of data-driven exploration and enjoy the journey of querying and analyzing with Presto and DbVisualizer!
FAQ
How do I install Presto on a Docker container?
How do I connect DbVisualizer to Presto?
How can I write and execute SQL queries in DbVisualizer with Presto?
Can I use Presto-specific functions and operators in DbVisualizer?
Yes, DbVisualizer supports Presto-specific functions and operators.


