Creating Queries Graphically
Only in DbVisualizer Pro
This feature is only available in the DbVisualizer Pro edition.
The Query Builder provides an easy way to develop database queries. The Query Builder provides a point and click interface and does not require in-depth knowledge about the SQL syntax.
The Query Builder is part of the SQL Commander, alongside the SQL Editor. When you are ready to test a query built with the Query Builder, you just load it to the SQL Editor for execution.
This document talks only about Tables even though the Query Builder supports both table and view objects.
Creating a Query
To create a query, open the query builder using the SQL Commander → Show Query Builder menu choice or click the vertical Query Builder button in the SQL Commander. Make sure that the controls in the top section of the Query Builder are set correctly.

The easiest way to jump between the Query Builder and the SQL Editor is by clicking the vertical control buttons to the right in the SQL Commander. Clicking these buttons changes the display, but does not copy the query from one display to the other. To copy the current query from the Query Builder to the SQL Editor, use the toolbar buttons at the top of the Query Builder:

From left to right, the button ...
- replaces the content of the SQL Editor with the query SQL and executes it.
- replaces the content of the SQL Editor with the query SQL, without executing it.
- adds the query last in the SQL Editor.
- copies the query to the system clipboard.
- opens a dialog that lets you add tables matching a search criteria.
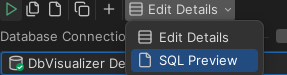
- is a drop-down menu for selecting what to show below the diagram area: query details or the SQL preview.
The first three buttons automatically change the display to the SQL Editor.
You can also load a query from the SQL Editor into the Query Builder, as described in detail below.
Adding tables
To add tables using drag and drop, make sure the database objects tree and the table and/or view objects are visible and that the SQL Commander is showing the Query Builder view. Then select and drag one or more nodes from the tree into the diagram.

When a table is dropped in the diagram area, it is shown as a window with the table name as the window title.
Below the table title is a text field where an optional table alias can be entered. If a table alias is specified, it is used in the Query Builder and the generated SQL statement to refer to this table.
Under the table alias field is a list of all table columns. Use the check box in front of each name to select whether the column should be included in the query result set. Columns selected for the query result set also appear in the Columns and Sorting details tabs.
Tables are added using a default layout; you can rearrange and resize them as you see fit.
Quick Table Add
An alternative to dragging and dropping tables into the Query Builder is to use the Quick Table Add dialog.

It lists tables matching the search criteria as you type it in the search text field. An asterisk ("*") can be used as a wildcard for any characters.
Joining Tables
To join two tables, select the column in the source table window with the mouse, drag it to the target table column, and drop it.

The two columns now represent a join condition, shown in the graph as a link between the columns. If more than one join condition is needed, link additional columns in the two tables by dragging and dropping the columns in the same way as for the first join condition. The default join type is an Inner join and the default condition is "equal to" (=), represented as an icon with overlapping circles with the shared area shaded and an equal sign below them.
Autojoin
Some database schemas declare how tables are related using primary and foreign keys. Other schemas use column names to indicate these relationships. For instance, in the figure above, the CITY table has a column named COUNTRY_ID, which refers to the column with the same name in the COUNTRY table. The Query Builder can be configured to use both kinds of rules to automatically join the tables you add to the query builder.
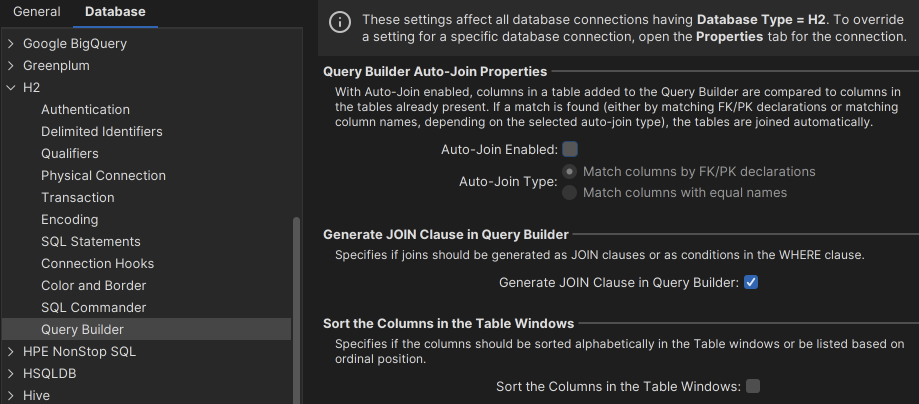
The auto-join feature is disabled by default. You can enable it in the tool properties for the database type (Tools → Tool Properties, under the Database tab) or for a specific connection (the Properties tab in the Object View tab for the connection). In the Query Builder category, you can enable the auto-join feature and select whether to use key declarations (FK/PK) or column names to find out how the tables are related.
When you add a new table with auto-join enabled, the Query Builder automatically joins it to the tables already in the builder if table columns match the selected matching rule.
If columns in the table you add are related to other columns in the same table, the Query Builder creates two windows for the table and joins them based on the matching rule. In this case, a table alias is also added for one of the windows so that you can tell the two windows for the same table apart.
Setting Join Properties
A Join Properties dialog can be opened by double-clicking the icon or selecting Join Properties from the right-click menu while the mouse pointer is over the join icon. The Join Properties dialog shows the source and target table columns and the conditional operator.
You can change the join type and the conditional operator in the Join Properties dialog. The join type defines how the records from the tables should be combined:
- Inner This is the most common join type as it finds the results in the intersection between the tables.
- Left This join type limits the results to those in the left table leaving 0 matching records in the right table as NULL.
- Right This is the same as left join but reversed
- Full A full join combines the results of both left and right joins.

If you have multiple join conditions (linked columns) between two tables, you can specify different conditional operators for each join condition, but the join type is shared between all join conditions; if you change it for one join condition, it is changed for all the other join conditions linking the two tables. This is not a restriction in the Query Builder but rather how SQL is defined.
Here is the sample SQL generated from the previous join definition:
SELECT
    *
FROM
    SAKILA.CITY
INNER JOIN
    SAKILA.COUNTRY
ON
    (
        SAKILA.CITY.COUNTRY_ID = SAKILA.COUNTRY.COUNTRY_ID);
Removing Tables and Joins
A table window is removed by clicking the close icon in the window header. A join is removed by selecting Remove Join in the right-click menu while the mouse pointer is over the join icon.

All tables and joins may be removed via Remove All Joins and Remove All Tables.
Specifying Query Details
The Details tabs below the diagram area are used to define the various parts of the query. The tabs basically represent the following parts of the final SQL:
  SELECT <Columns>
    FROM <Tables>
   WHERE <Conditions>
GROUP BY <Columns>
  HAVING <Grouping>
ORDER BY <Sorting>
(The Tables clause is defined in the diagram, not by a tab).
Use the Columns tab to specify characteristics of the columns that are included in the query. The list is initially empty until a column is checked in a table window or a column expression is added manually (see below). Columns will appear in the list in the same order as they are checked but may be moved at any time with the up and down buttons. To include all columns from a table, right-click in the column list in the table window and choose Select All.

The previous screenshot shows a total of 5 checked columns in the four tables. These are presented in the columns list by their full column identifier, qualified by either the table name or the table alias. To remove a column from the list, uncheck the corresponding column in the table window.
The alias field is used to specify an optional alias identifier for the column. The alias is used as the identifier for the column in the final query and also appears as the column name in the result set produced by the query. Check the documentation for the actual database to see if the alias must be quoted since the Query Builder does not do this for you.
The Aggregate and Group by fields are used in combination:
- The Aggregate field lists the available aggregation functions (AVG, COUNT, MAX, MIN, SUM) that may be used for columns
- The Group By field specifies whether the column should be included in the group for which aggregate columns are summarized
The Group By field is disabled unless an aggregate function is selected for at least one column, and once you select an aggregate function for one column, you must set Group By for at least one of the other columns to form a valid query. If you remove the aggregate function for all columns, Group By is automatically reset for all columns. Group By and Aggregate are also mutually exclusive options for one column, so when you select one of them, the field for the other is disabled for that column.
Custom Expressions
A custom expression may be added by entering data in the empty row last in the list, e.g., col1 + col2 or TO_CHAR(ts_col, 'DD-MON-YYYY HH24:MI:SSxFF'). Once entered, press Add button to insert a new empty row. You can remove a custom expression by selecting it and clicking the Remove button.
You can also launch a multi-line text editor for a custom expression, to make it easier to edit a large expression such as a CASE clause. Just double-click the expression cell, and then click on the editor launch button to the right.

Conditions
The Conditions tab is used to manage the WHERE clause for the query. A WHERE clause may consist of several conditions connected by AND or OR. The evaluation order for each condition is defined by indentation in the condition list. Each level in the list will be enclosed by brackets in the final SQL.
Here is an example from the Conditions tab.

To create a new WHERE condition, press the indexed button in the list. In the menu that is displayed you may choose to create a new condition on the same level, a compound condition or delete the current condition.
For compound conditions you may choose whether All (AND), Any (OR), None (NOT OR) or Not All (NOT AND) conditions must be met for its sub conditions. The SQL for the Conditions tab in the figure is:
WHERE
    YEAR("CU"."LAST_UPDATE") > 2019
OR  "CU".ACTIVE = TRUE
AND "CU".EMAIL IS NOT NULL;
Next to the input field for each condition, there is a drop down button. When pressed it shows all columns that are available in the tables currently being in the Query Builder. You can pick columns from the list instead of typing these manually.

A condition field may also contain a custom expression, and just as for a custom expression in the columns list, you can launch a multi-line editor for the expression by selecting the field and click the editor launch button.
Grouping
The Grouping tab is used to define the conditions for the HAVING clause that may follow a GROUP BY clause in an SQL query. This tab is only enabled when at least one of the columns in the Columns tab is marked as a Group By column.
The HAVING clause is similar to the WHERE clause, except that the HAVING clause limits what rows are included in the groups defined by the GROUP BY clause, after the WHERE clause has been used to limit the total number of rows to process.
You work with conditions in this tab in the same way as in the Conditions tab, with one exception regarding the drop-down button for the fields in a condition. In the Grouping tab, the drop-down shows all columns listed in the Columns tab, with an aggregate function expression for columns that have an aggregate function defined. This is because (according to the SQL specification) the conditions in a HAVING clause must only refer to columns that are being returned by the query.
Finally, the Sorting tab is used to specify how the final result set will be sorted. All columns for the tables in the graph, plus any custom expressions created for the selection list in the Columns tab, are listed in the Sorting tab.
SQL Preview
Select SQL Preview in the drop-down menu in the toolbar to show a preview of the final SQL. This is a read-only view and cannot be modified.
Testing the Query
To test the query, simply press the appropriate toolbar button in the Query Builder to copy the SQL to the SQL Editor. Then execute the SQL as usual in the SQL Editor. Or click the Execute button in the Query Builder toolbar to copy and execute the SQL in one step.

To further refine the SQL press the Query Builder button and make the necessary changes.
Loading a Query From the Editor
If you have an existing SQL query that you want to modify using the Query Builder, you can load it from the SQL Editor into the Query Builder by clicking the Load in Query Builder button in the SQL Editor toolbar.
It's important to be aware that the Query Builder does not support all features of the SQL SELECT statement, such as comments, UNION, and database-specific keywords. If you load a query into the Query Builder that contains unsupported constructs or keywords, they are ignored and a dialog pops up with a warning about this fact. You can then use the SQL Preview tab in the Query Builder to compare the SQL as it is represented in the Query Builder with the original SQL that you loaded to understand what was ignored.
Properties for the Query Builder
In addition to the Auto Join setting discussed above, there are a few other properties that control how the Query Builder works and the SQL it generates. You can set these properties for the database type (Tools → Tool Properties, under the Database tab) or for a specific connection (the Properties tab in the Object View tab for the connection).
Express joins as JOIN clause or WHERE condition
The Generate JOIN Clause in SQL Builder property is available in the [Database Type] → Query Builder category. Joins can be expressed either via the standardized SQL JOIN clause or a WHERE clause, using database-specific syntax for the Left and Right join types. The database-specific WHERE clause syntax is somewhat different between the supported databases and the Full outer join type is not supported. The default for this property is to use a JOIN clause.
A simple inner join expressed as a JOIN clause:
FROM SAKILA.CITY
INNER JOIN SAKILA.COUNTRY
ON ( SAKILA.CITY.COUNTRY_ID = SAKILA.COUNTRY.COUNTRY_ID );
Here is the same join expressed as a WHERE condition:
FROM SAKILA.CITY, SAKILA.COUNTRY
WHERE ( SAKILA.CITY.COUNTRY_ID = SAKILA.COUNTRY.COUNTRY_ID );
The syntax for expressing Inner and Outer joins in WHERE conditions is different between databases. Oracle, for example, uses the "(+)" sequence to the left or right of the conditional operator to express left or right joins. SQL Server and Sybase use "*=" or "=*" for the same purpose.
DbVisualizer automatically uses the correct join notation when generating joins as WHERE conditions for databases that support left and right joins using WHERE conditions. For databases that do not provide syntax for left and right joins, the join type is ignored and the WHERE condition that is generated produces an inner join result.
Table and Column Name qualifiers
Whether to qualify table names with the schema or database name and whether to qualify column names with the table name are defined in the [Database Type] / Qualifiers category.
Delimited Identifiers
Identifiers that contain mixed case characters or include special characters need to be delimited. Define this in the [Database Type] / Delimited Identifiers category.
Current Limitations
These are the current limitations in the Query Builder:
- Unions and sub queries are not supported.
- Not all join types are supported when joins are expressed as WHERE clause conditions. The Inner join type is supported for all databases, but the Left and Right types are only supported for databases with proprietary syntax to express these types, e.g., Oracle, SQL Server and Sybase. The Full type is not supported for any database. If a join type is not supported, the setting in the Join Properties dialog is silently ignored.
- When importing an SQL query from the SQL Editor, comments, unsupported keywords and statement clauses are ignored. A dialog tells you which parts of the query are being ignored when unsupported parts are found in the imported statement.
- There is only limited support for the CASE clause, in that everything between CASE and END is treated as uninterpreted text. This means that, as opposed to plain object references in the select list or conditions, column names and other identifiers within a CASE clause are not affected by changes to the Query Builder property settings, such as Delimited Identifiers and Qualifiers.