intro
In this article, we tell you how to best use some of the advanced SQL Querying techniques to manipulate and analyze data while making use of PostgreSQL and DbVisualizer - an advanced database client and SQL editor.
This article will delve into the details of writing complex SQL queries using the techniques below.
Why SQL?
SQL (Structured Query Language) is a programming language specifically designed for managing and manipulating data stored in relational databases. It is used to create, modify, and query databases, as well as to control user access to the data.
In data analysis, SQL is often used in conjunction with other tools and techniques, such as data visualization software and statistical analysis tools and packages. It is also commonly used to prepare data for machine learning algorithms, as well as to perform ad-hoc analysis and also to generate reports.
In order to be successful in today's competitive business environment, it is essential for companies to use data analysis to make informed, strategic decisions and optimize their operations for maximum efficiency and profitability.
DbVisualizer and PostgreSQL
DbVisualizer is a versatile database management and analysis tool that can be used to connect to and manage a wide variety of database management systems, including Oracle, PostgreSQL, and more. It provides a range of features for managing and manipulating data, including a SQL editor, data visualization tools, and support for database design and development. PostgreSQL, also known as Postgres, is a free and open source advanced relational database system.
Setting Up PostgreSQL
To set up PostgreSQL on your computer, you’ll have to download and install Postgres. The installation process will vary depending on your operating system.
Run the command below in the terminal of your computer to confirm the successful installation of Postgres on your computer.
                    $
                    psql -U postgres
When the prompt opens, set a password for PostgreSQL from the prompt given. Now, let us create a PostgreSQL database to contain the data of a random hypothetical e-commerce business. Run the command below in the terminal of your computer to create the ecommerce database.
                    $
                    CREATE database ecommerce;
To check if the database has been created successfully in the list of databases, run the command below.
                    $
                    \list
We can see that the e-commerce database has been created.

The DbVisualizer SQL Editor
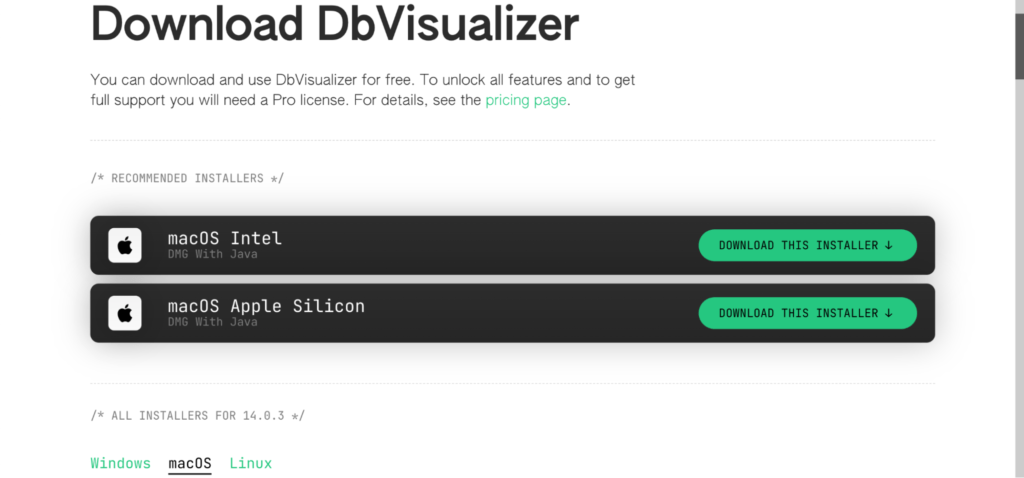
Navigate to the DbVisualizer download page to download and install DbVisualizer on your computer. DbVisualizer is available for Windows, macOS and Linux.
Open DbVisualizer once it has been installed, Click on the “Create a Database Connection” button.
Integrating the DbVisualizer SQL Editor With Postgres

Once you start the process, you will be prompted to select your driver. Select PostgreSQL from the list of drivers.

Input the database credentials required: Name, Database, Database Userid and Database Password and click on the “Connect” button afterwards.

This is what happens when the integration is done correctly.

Creating Tables in DbVisualizer
In this article, we will use an online shopping sample data from the kaggle webpage and this ecommerce data. The kaggle webpage dataset has been customized for the purpose of this article and the customized version can be downloaded here.
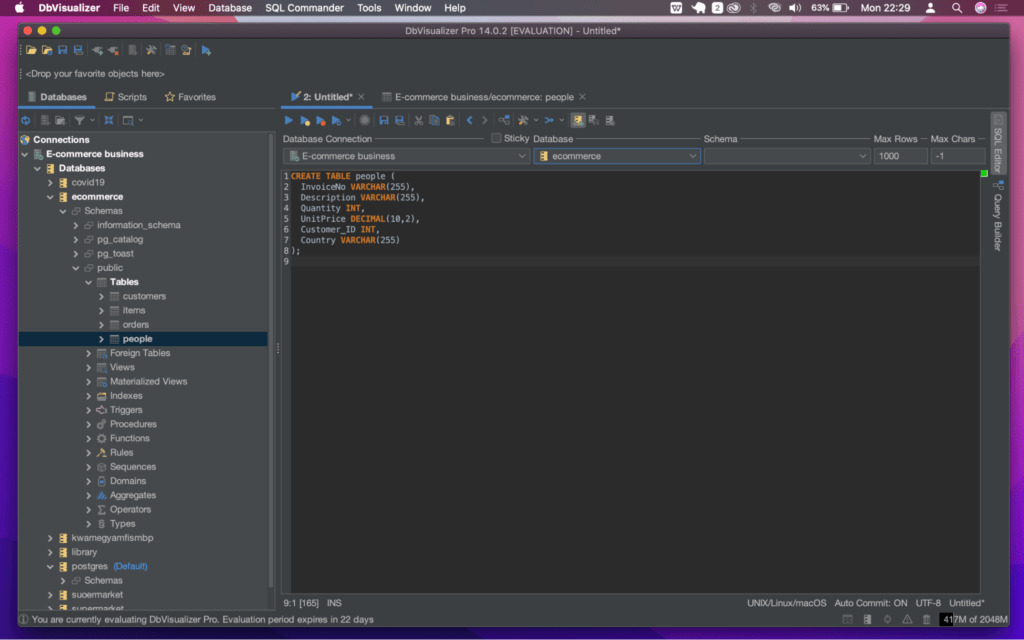
Since the sample data we’re going to work with contains data on people with the columns "InvoiceNo," "Description," "Quantity," "UnitPrice," "Customer ID," and "Country", let us write the following query to create a table in a database. From the menu bar of the DbVisualizer window, click on the ‘SQL Commander’ option, select ‘New SQL Commander’.

Now, enter the query below.
                    1
                    CREATE TABLE people (


                    2
                         InvoiceNo VARCHAR(255),


                    3
                        Description VARCHAR(255),


                    4
                        Quantity INT,


                    5
                        UnitPrice DECIMAL(10,2),


                    6
                        Customer_ID INT,


                    7
                        Country VARCHAR(255)


                    8
                    );
This query will create a table called "people" with the specified columns. The data types of the columns are based on the type of data that is stored in each column.
After writing the SQL query in the SQL Commander tool within DbVisualizer, choose the database connection you would want to use by clicking on the "Choose Connection" dropdown menu in the toolbar and select the connection you prefer and clicking on the “Sticky Database” drop down menu and selecting the database where you want to create the tables.

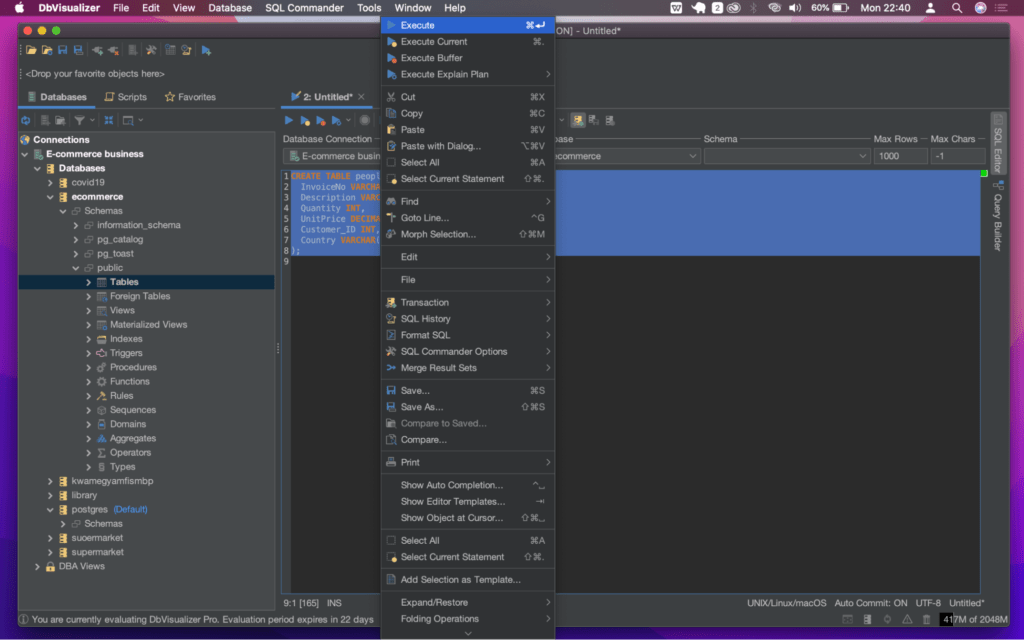
You can now execute the SQL statements in the SQL commander by right-clicking any space on the window and selecting the "Execute" option from the menu.
You should see success in the DbVisualizer log after successful execution. Now, navigate to the Schemas, select ‘Tables’, right-click on Tables and select ‘Refresh Objects Tree’ to update the Tables Schema with the newly created table.

Now, open the ‘tables’ data tree to see the addition of the ‘people’ table to the Tables Schema.
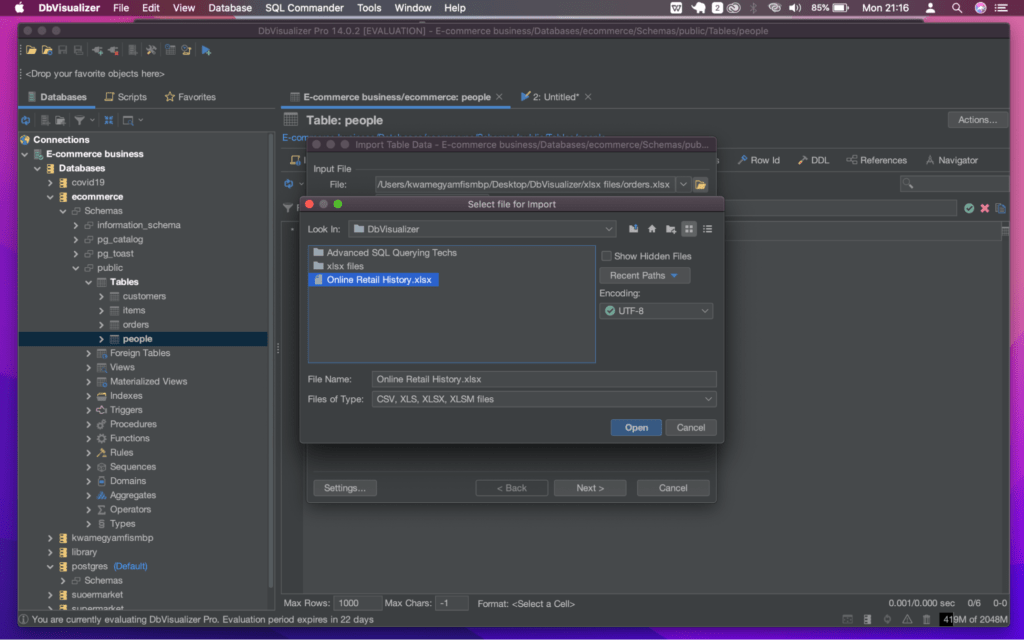
Importing XLSX Files Into the Database Using DbVisualizer
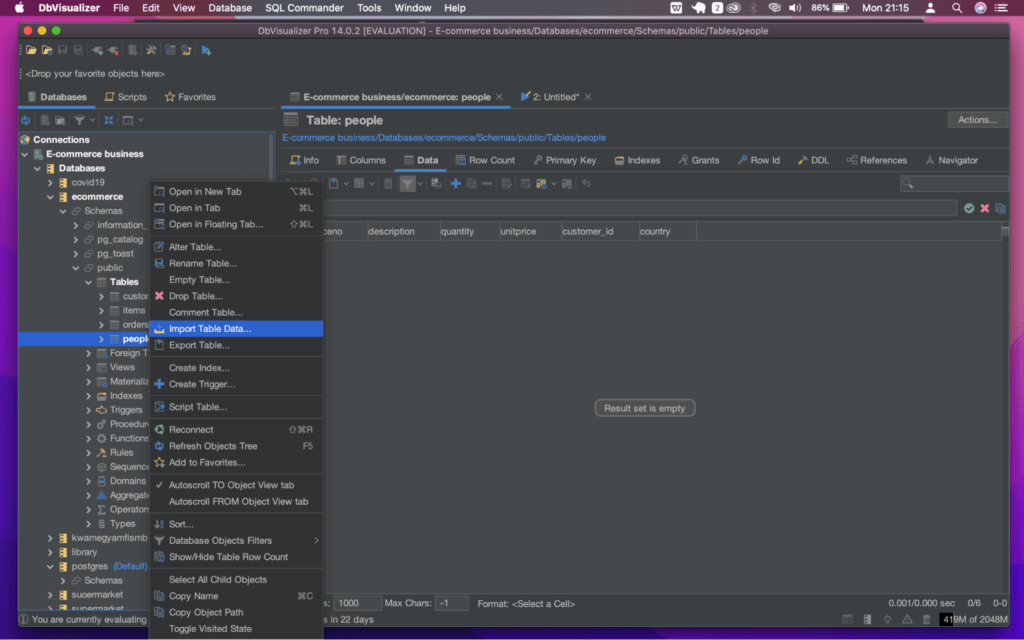
It is important to have data to work with. In this section, we will cover the process of importing XLSX files into the database. To do this, let us add data to the created tables by doing the following:

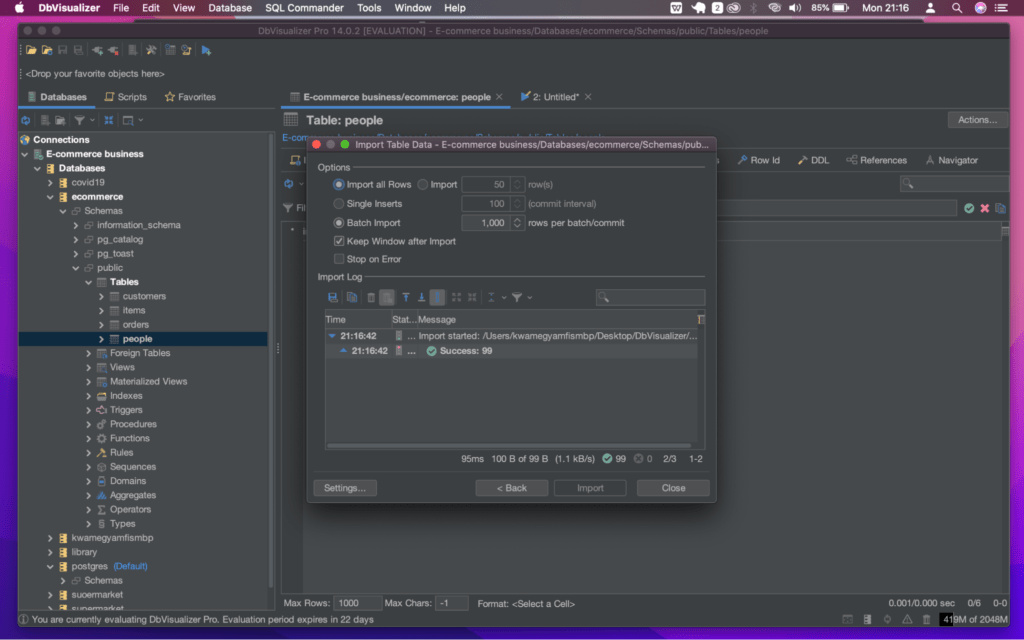
Once the import is successful, you should see the status in the import log like below:
To view the data, click on the ‘people’ table and then switch to the ‘data’ tab located beneath the ‘people’ table database directory at the upper part of the DbVisualizer window. The imported data should be available as shown below.

Advanced SQL Querying Techniques
Having covered the essential preparation steps, let us explore some advanced SQL querying techniques.
(A) Joins: Inner and Outer Joins & Self and Cross Joins
A join is a way to combine rows from two or more tables based on a related column. It allows you to retrieve data from multiple tables and merge it into a single result set to perform more complex queries and analytics operations. The several types of joins in SQL include: inner join, outer join, self, and cross join.
Inner Joins
Inner joins return only the rows that match the join condition in both tables. Inner joins combine rows from two or more tables based on a common column between them. The result includes only the rows that have matching values in both tables. Inner joins are performed using an equality operator (=) in the join condition. The common column acts as a key that links the two tables together, and the result of the join is a new table that includes all the columns from both tables.
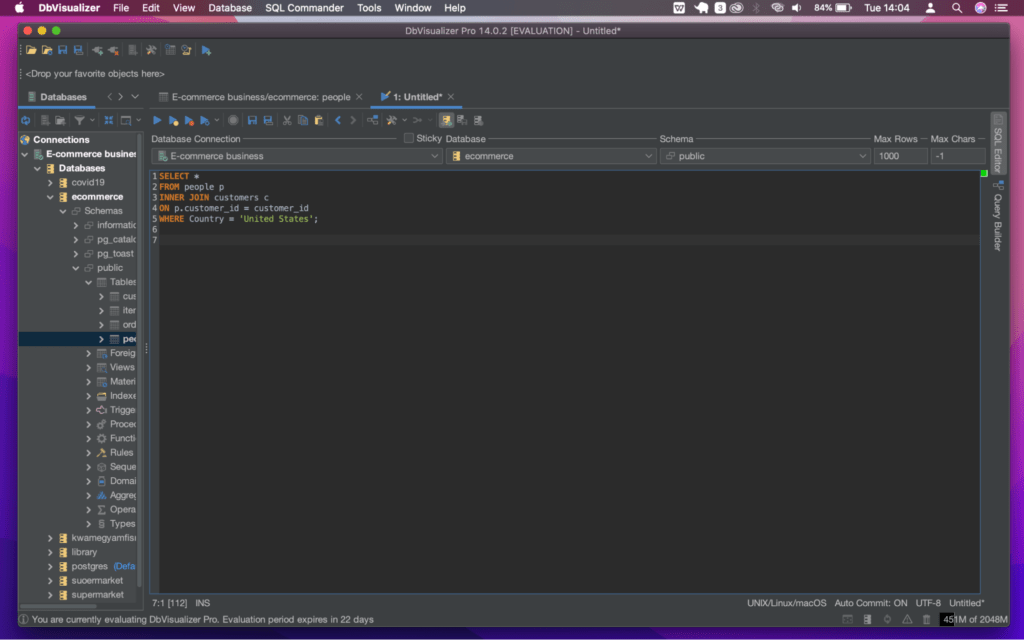
For example: Let us use an inner join to retrieve all the invoices for customers in a specific country with the following query:
                    1
                    SELECT *


                    2
                    FROM people p


                    3
                    INNER JOIN customers c


                    4
                    ON p.CustomerID = CustomerID


                    5
                    WHERE Country = 'United States';
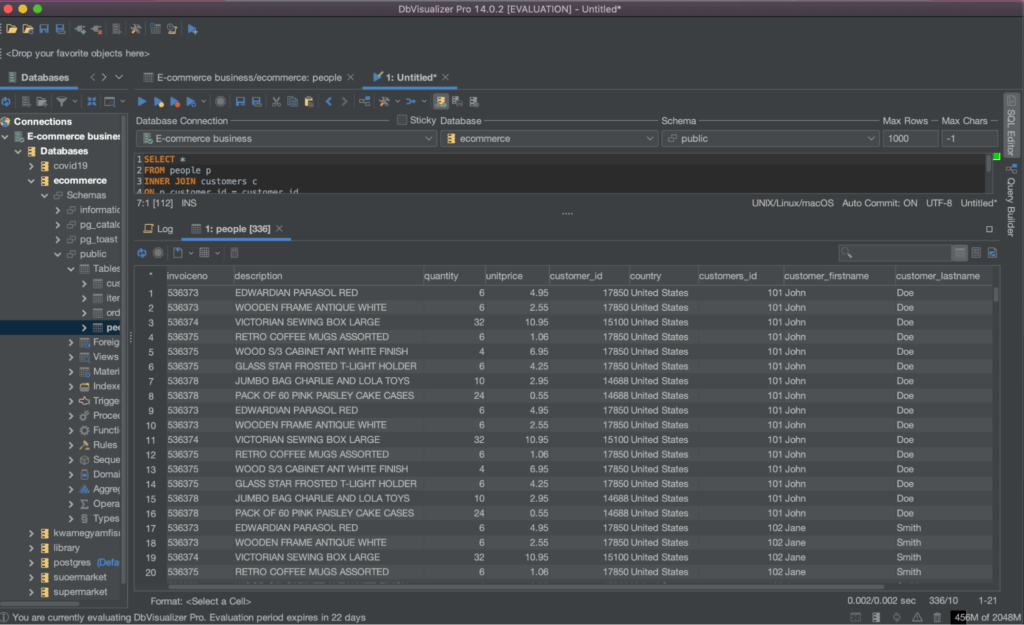
Open the DbVisualizer SQL Commander, enter the query above and execute the query.
An inner join and a ‘GROUP BY’ clause can also be used to calculate the total quantity and total cost of each type of product for each customer. Let us execute the query below:
                    1
                    SELECT customer_id, p.description, SUM(p.quantity) AS total_quantity, SUM(p.quantity * p.unitprice) AS total_cost


                    2
                    FROM people p


                    3
                    INNER JOIN customers c


                    4
                    ON p.customer_id = customer_id


                    5
                    GROUP BY customer_id, p.description;
This query will return a row for each combination of "customer_id" and "description," showing the total quantity and total cost of each type of product for each customer as shown below.

Outer Joins
Outer joins return all rows from both tables, including the rows that do not match the join condition. There are three types of outer joins: Left outer join, or right outer join, and full outer join.
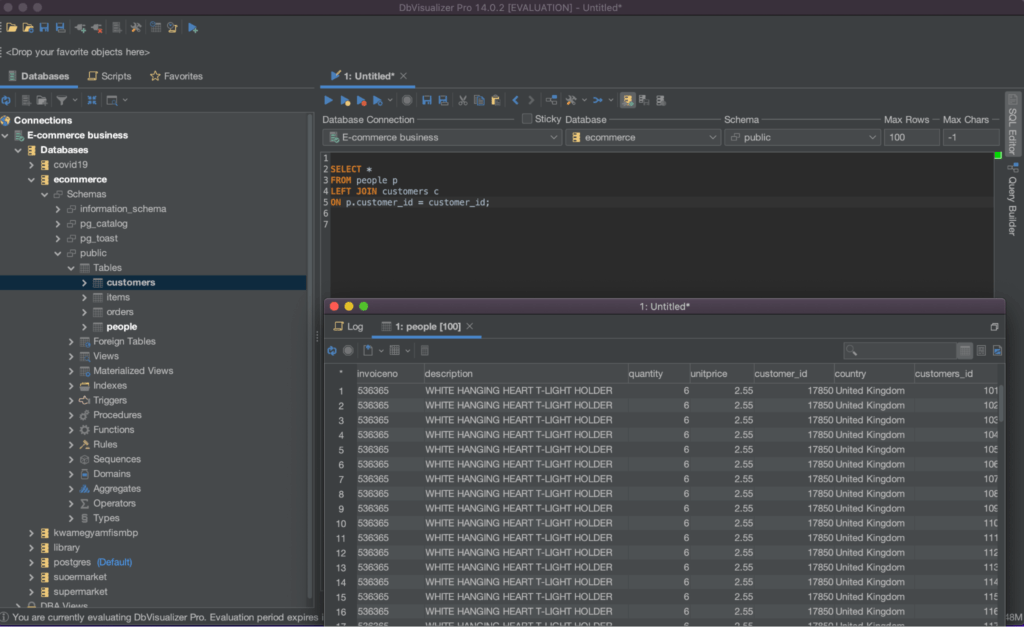
An example of the left outer join querying technique is shown below:
                    1
                    SELECT *


                    2
                    FROM people p


                    3
                    LEFT JOIN customers c


                    4
                    ON p.customer_id = customer_id
Execute the query above to return all rows from the ‘people’ table and any matching rows from the ‘customers’ table. The result set will include all columns from the table below.
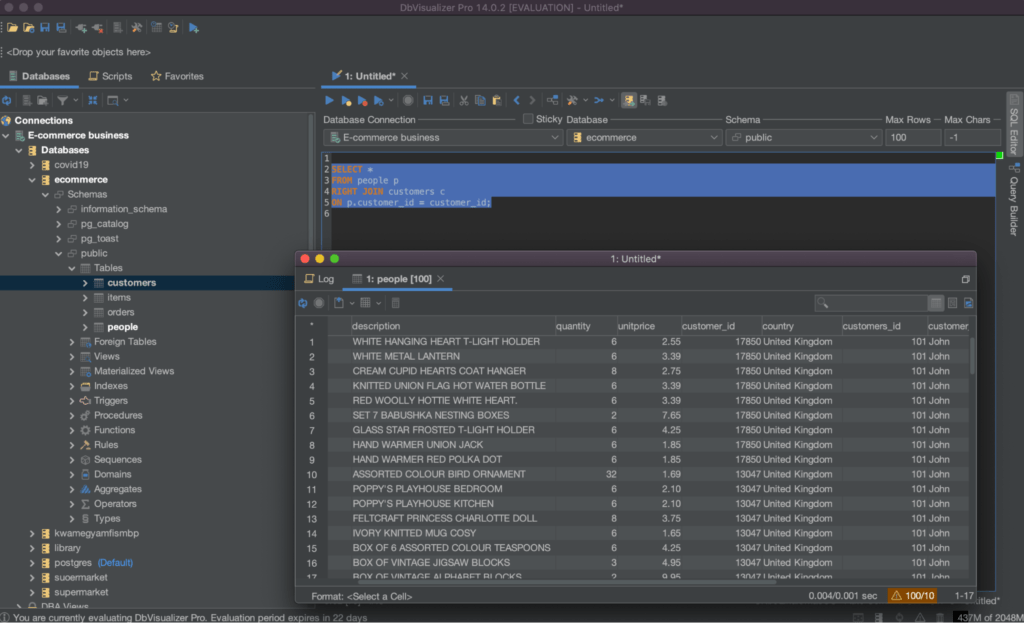
An example of the right outer join querying technique is shown below:
                    1
                    SELECT *


                    2
                    FROM people p


                    3
                    RIGHT JOIN customers c


                    4
                    ON p.customer_id = customer_id;
Executing this query will return all rows from the ‘customers’ table and any matching rows from the ‘people’ tabs. The result set will include all columns from both tables as shown below.
Right and left outer joins specifically allow for retrieving the data from one or both tables in a query, even if there is no matching data in the joined table. Understanding these types of joins can greatly enhance the efficiency and accuracy of retrieving data in your SQL queries.
Self Joins
Self joins are joins that allow you to join a table to itself. A self join is useful when you want to compare rows within a single table, or when you want to retrieve data from a table that has a tree-like structure.
To find pairs of people with the same country, you can use a self-join with a join condition that compares the ‘country’ column in two copies of the ‘people’ table. Run the query below:
                    1
                    SELECT p.*, c.*


                    2
                    FROM people p


                    3
                    JOIN customers c


                    4
                    ON p.country = country


                    5
                    AND p.customer_id = customer_id;

Self joins allow you to join a table to itself and compare data within the same table. They are often used to break down complex data structures into simpler components and make it easier to understand and analyze the data. It is important to remember to properly alias the table names when performing a self join, to avoid confusion and ensure accurate results.
If you are looking for an easy and powerful SQL client and database manager, then you've got to try DbVisualizer. It connects to nearly any database.
Cross Joins
Cross joins return all possible combinations of rows from the two tables. It does not use a join condition and is generally used for testing or when no meaningful relationship exists between the two tables.
Here is an illustration of an advanced cross-join technique.
                    1
                    SELECT *


                    2
                    FROM people


                    3
                    CROSS JOIN customers
The result set will have one row for each combination of a row from the ‘people’ table and a row for the ‘customers’ table as shown below:

                    1
                    SELECT *


                    2
                    FROM people


                    3
                    CROSS JOIN customers


                    4
                    WHERE people.customer_id IS NOT NULL

Cross joins allow the combination of every row from one table with every row from another table, resulting in a Cartesian product. While this type of join can produce large result sets, it can be useful for specific scenarios such as generating all possible combinations.
(B) Advanced Grouping and Filtering Methods
Using the ‘GROUP BY’ clause with multiple columns and aggregate functions.
The GROUP BY clause is used in a SELECT statement to group together rows that have the same values in one or more columns. It is typically used in conjunction with aggregate functions, such as SUM(), AVG(), MIN(), and MAX(), to compute aggregated values for each group.
For example, consider a table called people with the following columns: customer_id, description, quantity, and unitprice. To find the total quantity and total price for each combination of customer and description (product), you can use the following query:
                    1
                    SELECT customer_id, description, SUM(quantity) as total_quantity, SUM(unitprice) as total_price


                    2
                    FROM people


                    3
                    GROUP BY customer_id, description
This will group the rows in the people table by customer_id and description, and compute the total quantity and total price for each group. The result set will have one row for each combination of customer_id and description, with the total_quantity and total_price columns showing the aggregated values as below:

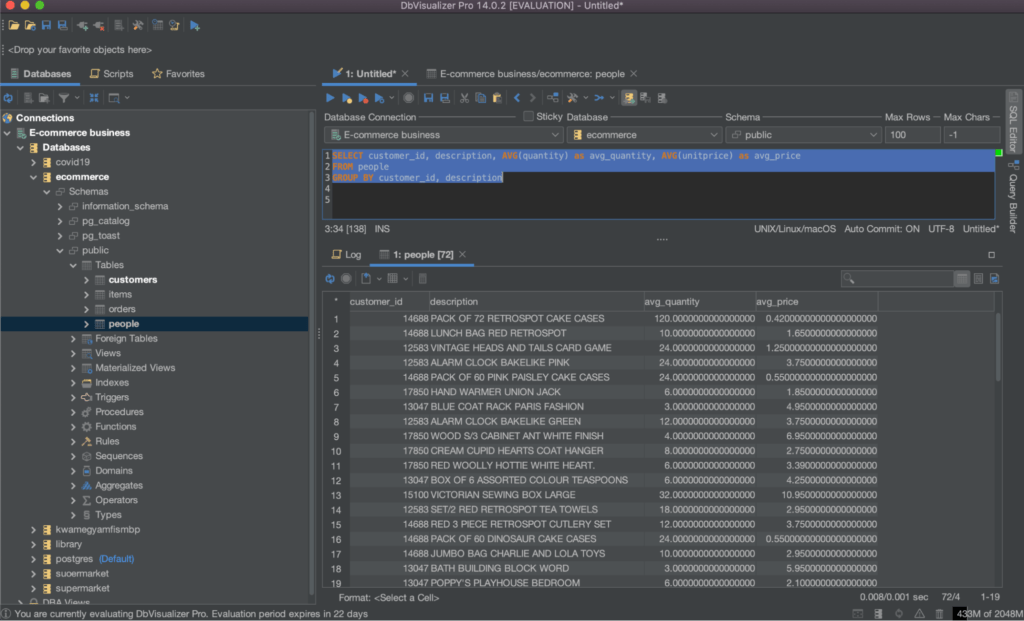
Another way is to use aggregate functions in the SELECT clause, such as AVG(), MIN(), and MAX(). For example, to find the average quantity and average price for each combination of customer and product, you can use the following query:
                    1
                    SELECT customer_id, description, AVG(quantity) as avg_quantity, AVG(unitprice) as avg_price


                    2
                    FROM people


                    3
                    GROUP BY customer_id, description
This will group the rows in the people table by customer_id and description, and compute the average quantity and average price for each group. The result set will have one row for each combination of customer_id and description, with the avg_quantity and avg_price columns showing the aggregated values as shown below:
Using the CASE statement for conditional filtering
The CASE statement is a control flow statement that allows you to add conditional logic to a SELECT, UPDATE, INSERT, or DELETE statement. It can be used to perform conditional filtering in a SELECT statement by including it in the WHERE clause.
For example, to find all invoices where the quantity is greater than 10 and the unitprice is greater than $7, you can use the following query:
                    1
                    SELECT *


                    2
                    FROM people


                    3
                    WHERE


                    4
                        CASE


                    5
                            WHEN quantity > 10 THEN 1


                    6
                            WHEN unitprice > 7 THEN 1


                    7
                            ELSE 0


                    8
                        END = 1
This will evaluate the CASE statement for each row in the people table. If the quantity column is greater than 10 or the unitprice column is greater than $7, the CASE statement will return 1 and the row will be included in the result set.

The use of the "GROUP BY" clause with multiple columns and aggregate functions, as well as the CASE statement for conditional filtering, are powerful tools in advanced SQL grouping and filtering techniques. These techniques allow you to group data based on multiple columns and apply aggregate functions to the grouped data, while the CASE statement enables you to perform conditional filtering of your data, making it easier to extract meaningful insights from your database.
(C) Advanced Set Operation Methods (UNION, INTERSECT & EXCEPT)
The UNION, INTERSECT, and EXCEPT clauses are set operations that allow you to combine the results of two SELECT statements into a single result set.
The UNION clause combines the results of two SELECT statements and returns all rows that appear in either result set. It removes duplicates, so each row is returned only once, even if it appears in both result sets.
For example, to find all invoices and customers who live in the 'United States', you can use the following query:
                    1
                    SELECT invoiceno, description, quantity, unitprice, country


                    2
                    FROM people


                    3
                    WHERE country = 'United States'


                    4
                    UNION


                    5
                    SELECT id, name, address, phone, country


                    6
                    FROM customers


                    7
                    WHERE country = 'United States'
The INTERSECT clause combines the results of two SELECT statements and returns only rows that appear in both result sets. For example, to find all invoices and customers who are both from the 'United States' and have the same name, you can use the following query:
                    1
                    SELECT invoiceno, description, quantity, unitprice, country


                    2
                    FROM people


                    3
                    WHERE country = 'United States'


                    4
                    INTERSECT


                    5
                    SELECT id, name, address, phone, country


                    6
                    FROM customers


                    7
                    WHERE country = 'United States'
The EXCEPT clause combines the results of two SELECT statements and returns only rows that appear in the first result set but not the second. For example, to find all invoices from the ‘people’ table that do not have a matching customer in the ‘customers’ table, you can use the following query:
                    1
                    SELECT invoiceno, description, quantity, unitprice, country


                    2
                    FROM people


                    3
                    EXCEPT


                    4
                    SELECT id, name, address, phone, country


                    5
                    FROM customers
This query will return all rows from the people table that do not have a matching row in the customers table.
(D) Using Advanced Queries to Insert, Update and Delete Data.
Advanced queries can be used to insert, update, and delete data in a database.
Inserting data into a table
For example, to insert a new row into the people table, you can use the following query:
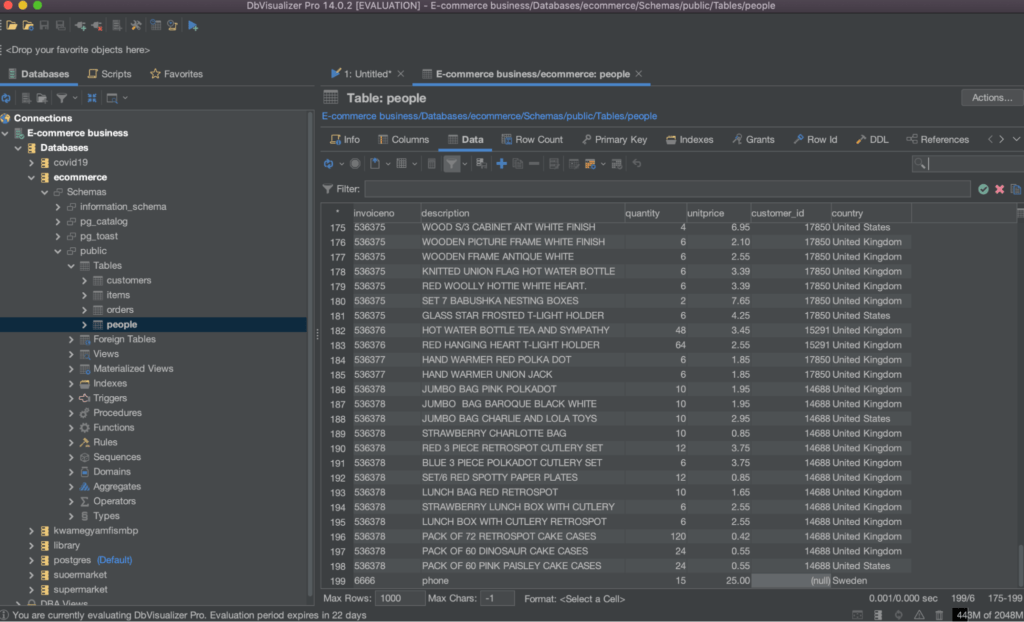
                    1
                    INSERT INTO people (invoiceno, description, quantity, unitprice, country)


                    2
                    VALUES (6666, 'phone', 15, 25, 'Sweden')
This query will insert a new row into the people table with the values 6666 for the invoiceno, phone for the description, 15 for the quantity, 25 for the unitprice, and Sweden for the country as below.

Refresh your table to see the newly inserted row.
Updating a table data
To update data in a table, you can use the UPDATE statement. For example, to update the quantity and unitprice of an invoice in the people table, you can use the following query:
                    1
                    UPDATE people


                    2
                    SET quantity = 8, unitprice = 71


                    3
                    WHERE invoiceno = 6666
This query will update the quantity and unitprice of the invoice with invoiceno 6666 to 8 and 71, in that order.
Deleting data from a table
To delete data from a table, you can use the DELETE FROM statement. For example, to delete an invoice from the people table, you can use the following query:
                    1
                    DELETE FROM people


                    2
                    WHERE invoiceno = 6666
This query will delete the invoice with invoiceno 6666 from the ‘people’ table.
Conclusion
Advanced SQL querying techniques allow developers and data analysts to work with their databases in a more efficient and effective manner. These techniques, such as self-joins, outer joins, inner joins, cross joins, grouping, and filtering, are essential tools in retrieving and manipulating data in complex databases. By using these techniques, you can extract meaningful insights, make better decisions, and improve the accuracy and reliability of your data.
You have learned how to implement advanced SQL querying techniques. Along the way, you have also learned to set up DbVisualizer and integrate it with your database management system. DbVisualizer is a universal database management and analysis tool and preferred tool for the world’s leading database professionals that helps users manage and analyze data in almost all databases. It offers a wide range of features. Learn more about DbVisualizer here.
Frequently Asked Questions
What is an inner join in SQL and how does it work?
An inner join in SQL combines rows from two or more tables based on a matching column between the tables. It only returns rows where there is a match in the specified columns in both tables.
How does an outer join differ from an inner join in SQL?
An outer join in SQL includes rows from one or both tables that do not have a matching value in the joined column but an inner join only returns rows where there is a match in the specified columns in both tables.
How do advanced grouping and filtering methods in SQL differ from basic techniques?
Advanced grouping and filtering methods in SQL allow users to more precisely control the data that is returned in their queries, such as using the "HAVING" clause to filter the results of a query based on the values in a group, rather than on individual rows. These methods offer more flexibility and control than basic techniques.
What is the purpose of set operations in SQL, such as UNION, INTERSECT, and EXCEPT?
Set operations in SQL allow users to combine the results of multiple queries into a single result set. The UNION operator combines the results of two or more queries and returns all rows that are unique across all queries. The INTERSECT operator returns only rows that are common to both queries. The EXCEPT operator returns rows that are in the first query, but not in the second.
Can you provide an example of a self-join in SQL?
For example, if a table named "employees" has a column named "manager," a self-join could be used to create a query that returns a list of employees and the name of their manager. The self-join would join the "employees" table to itself, using the "manager" column to match the rows.