intro
Learn how to containerize a database with Docker and DbVisualizer to simplify your deployment process.
Introduction
Docker is an open-source platform for building, shipping, and running applications in containers. Containers provide a lightweight and portable way to package and deploy software, making it easier to move applications between environments and platforms. By using Docker to containerize your database application, you can ensure that it runs consistently across different environments, making it easier to deploy and manage.
In this tutorial, we will walk through the process of containerizing a MySQL database using Docker and connecting to it using DbVisualizer. We will start with a simple example and then move on to more complex scenarios, including using Docker Compose to orchestrate multiple containers and using environment variables to configure our container.
To follow this tutorial, you will need:
Getting Started
Let's start by creating a simple Dockerfile for our MySQL database. The Dockerfile specifies the base image to use, any additional software packages to install, and any files to copy into the container.
Create a new file named Dockerfile with the following contents:
                    1
                    FROM mysql:latest


                    2
                    ENV MYSQL_ROOT_PASSWORD=password


                    3
                    COPY my-database.sql /docker-entrypoint-initdb.d/
This Dockerfile uses the official MySQL Docker image as the base image, sets the root password to "password" using the ENV instruction, and copies a SQL script named `my-database.sql` to the `/docker-entrypoint-initdb.d/` directory inside the container. This script will be executed when the container starts up, creating our database and any tables or data we need.
Save the Dockerfile to a new directory named my-database.
Next, let's build our Docker image using the docker build command:
                    $
                    docker build -t my-database .
This command builds a Docker image with the name my-database using the Dockerfile in the current directory.
Now that we have our Docker image, let's start a container from it using the docker run command:
                    $
                    docker run -p 3306:3306 --name my-database-container -d my-database
This command starts a container named my-database-container from the my-database image, maps port 3306 to the host, and runs the container in a detached mode.
Connecting to the MySQL Database with DbVisualizer
With our container up and running, let's connect to our MySQL database using DbVisualizer.
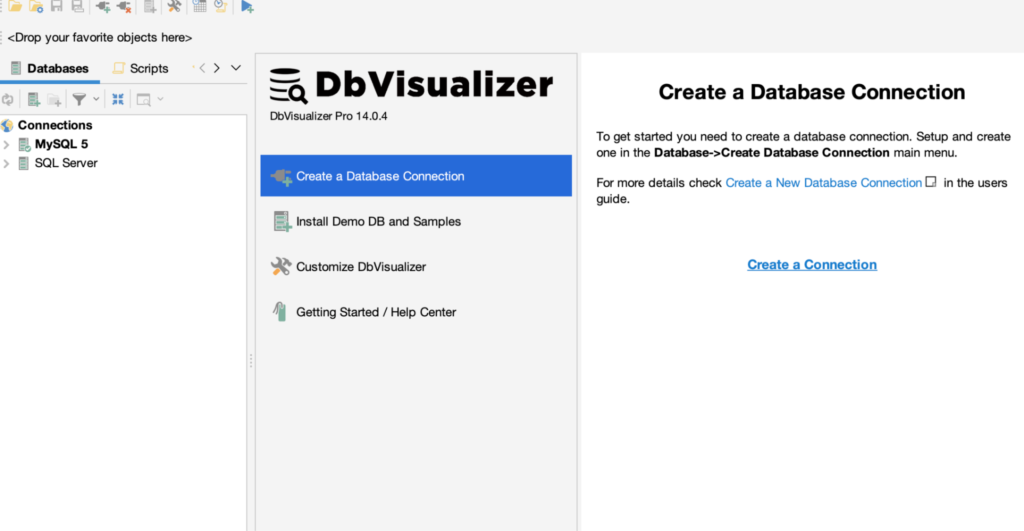
Open DbVisualizer and go to the Connection tab. Click the "Create a Connection" button to create a new connection.
Select your database server type. For this tutorial, we will be choosing MySQL 8(Connector/J) as the driver.

In the Driver Properties tab, select MySQL and enter the following information:
Database server: localhost Database Port: 3306 Database UserId: root Database Password: password( the password you set in the MySQL deployment YAML file)
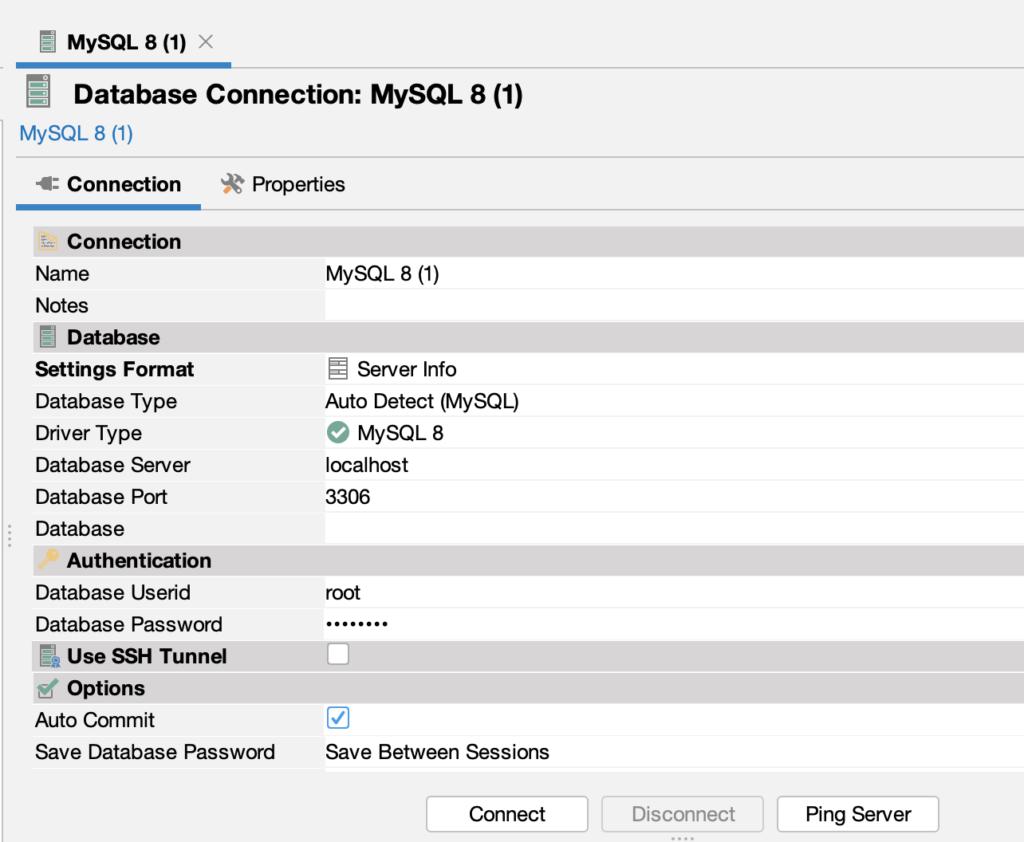
Click the "Connect" button to test the connection.
If the connection is successful, you should see a message indicating that the connection was established. You can now browse the database and run queries using DbVisualizer.

Using Docker Compose with MySQL
So far, we have only worked with a single container. In a real-world scenario, we may need to deploy multiple containers that work together to form a larger application. Docker Compose is a tool for defining and running multi-container Docker applications, making it easier to orchestrate multiple containers and manage dependencies between them.
Let's create a Docker Compose file that defines our MySQL database container and a web application container that depends on it.
Create a new file named docker-compose.yml with the following contents:
                    1
                    version: "3"


                    2
                    services:


                    3
                    db:


                    4
                    image: mysql:latest


                    5
                    environment:


                    6
                    MYSQL_ROOT_PASSWORD: password


                    7
                    volumes:


                    8
                    - ./my-database.sql:/docker-entrypoint-initdb.d/my-database.sql


                    9
                    web:


                    10
                    build: .


                    11
                    ports:


                    12
                    - "8000:8000"


                    13
                    depends_on:


                    14
                    - db
This Docker Compose file defines two services: a MySQL database service named db and a web application service named web. The db service uses the official MySQL Docker image and sets the root password using an environment variable. It also mounts the “my-database.sql” file from the current directory as a volume, so that it can be executed when the container starts up.
The web service builds an image from the current directory and maps port 8000 to the host. It also depends on the db service, so that the database is started before the web application.
To start the containers using Docker Compose, run the following command in the same directory as the docker-compose.yml file:
                    $
                    docker-compose up
This command starts the containers defined in the Docker Compose file and outputs their logs to the console. Press Ctrl+C to stop the containers.
To start the containers in detached mode, add the -d option:
                    $
                    docker-compose up -d
This command starts the containers in the background.
MySQL Dockerfile Environment Variables
In some cases, we may need to configure our container using environment variables. For example, we may want to specify the database name, username, and password as environment variables rather than hard-coding them in our Dockerfile.
Let's modify our Dockerfile to use environment variables for the database name, username, and password.
Create a new Dockerfile named Dockerfile-env with the following contents:
                    1
                    FROM mysql:latest


                    2


                    3
                    ENV MYSQL_ROOT_PASSWORD=${MYSQL_ROOT_PASSWORD}


                    4
                    ENV MYSQL_DATABASE=${MYSQL_DATABASE}


                    5
                    ENV MYSQL_USER=${MYSQL_USER}


                    6
                    ENV MYSQL_PASSWORD=${MYSQL_PASSWORD}


                    7


                    8
                    COPY my-database.sql /docker-entrypoint-initdb.d/
This Dockerfile uses environment variables to set the root password, database name, username, and password. The COPY instruction remains the same.
Save the Dockerfile to a new directory named “my-database-env”.
MySQL Docker image
To build the Docker image, we need to pass in the values of the environment variables. We can do this using the --build-arg option:
                    $
                    docker build --build-arg MYSQL_ROOT_PASSWORD=password --build-arg MYSQL_DATABASE=my_database --build-arg MYSQL_USER=my_user --build-arg MYSQL_PASSWORD=my_password -t my-database-env .
This command builds a Docker image with the name `my-database-env` using the Dockerfile in the current directory, passing in the values of the environment variables using the `--build-arg` option.
To start a container from the image, use the same docker run command as before:
                    $
                    docker run -p 3306:3306 --name my-database-container -d -e MYSQL_ROOT_PASSWORD=password -e MYSQL_DATABASE=my_database -e MYSQL_USER=my_user -e MYSQL_PASSWORD=my_password my-database-env
This command starts a container named my-database-container from the my-database-env image, maps port 3306 to the host, and sets the values of the environment variables using the -e option.
Conclusion
In this tutorial, we walked through the process of containerizing a MySQL database using Docker and connecting to it using DbVisualizer. We started with a simple example and then moved on to more complex scenarios, including using Docker Compose to orchestrate multiple containers and using environment variables to configure our container.
💪 By using Docker to containerize our database application, we can guarantee that it will function uniformly across various environments, which makes it simpler to deploy and manage. Additionally, using DbVisualizer to connect to our containerized database allows us to explore the database and execute queries just as we would with a typical database.
🚀 Docker and DbVisualizer are powerful tools that can simplify the process of developing, deploying, and managing database applications. By combining these tools, we can create a seamless development and deployment workflow that ensures consistency and reliability across all environments.
I hope this tutorial has been helpful in getting you started with Docker and DbVisualizer. If you have any questions or feedback, feel free to leave a comment below. Happy coding 🎉 !
FAQs (Frequently Asked Questions)
What is Docker, and why should I containerize my database?
Docker is an open-source platform for building, shipping, and running applications in containers. Containerizing your database provides a lightweight and portable way to package and deploy your software, ensuring consistent performance across different environments.
How do I containerize a MySQL database with Docker?
To containerize a MySQL database, create a Dockerfile specifying the base image, set environment variables, and copy SQL scripts into the container. Build the Docker image and run a container from it using Docker commands.
How do I connect to a containerized MySQL database with DbVisualizer?
Open DbVisualizer, create a new database connection, select the MySQL driver, and enter the connection details (server, port, user, password). Test the connection, and if successful, you can browse the database and execute queries in DbVisualizer.
What is Docker Compose, and how can I use it with MySQL?
Docker Compose is a tool for defining and running multi-container Docker applications. It helps orchestrate multiple containers and manage dependencies. To use Docker Compose with MySQL, define services for the database and any related services in a docker-compose.yml file and run the containers using the `docker-compose up` command.
How can I use environment variables in my MySQL Docker image?
To use environment variables in a MySQL Docker image, modify the Dockerfile to include `ENV` instructions for the desired variables. Then, pass the values of the environment variables during the image build or container run using the `-e` or `--build-arg` options.