Managing Database Drivers
DbVisualizer comes with driver templates for the most common databases. When you create a connection for one of these databases, the driver is downloaded automatically, so you can go straight to creating a connection.
Read on if you want to learn how the Driver Manager works, add a driver for a database that has no template, or use several versions of the same driver.
What is a database driver?
DbVisualizer doesn't communicate with databases directly. That job is done by a driver, a set of Java classes that implements the details of how to communicate with a specific database. DbVisualizer connects to databases through JDBC drivers, which follow the Java standard for database access. Drivers are available from the database vendors and from third parties.
There are four types of drivers. We recommend type 4 drivers, also known as thin drivers, since they are pure Java drivers that don't depend on any native libraries. If you need a driver that does, see Using drivers depending on native API (Type 2 JDBC driver).
Finding a driver
The Supported Databases page lists the databases that we have tested and that have templates in DbVisualizer. It also describes where to download drivers that DbVisualizer can't download itself, and any extra steps needed to install them.
For other databases, look for a JDBC driver on the database vendor's website, or search for the name of the database followed by JDBC. Many drivers are published in Maven repositories, which DbVisualizer can download from directly. If a driver is only available as a file, download it and follow the installation instructions that come with it. If the driver comes as a ZIP file, unpack it first.
Opening the Driver Manager
Drivers are managed in the Driver Manager. To open it, select Tools → Driver Manager.
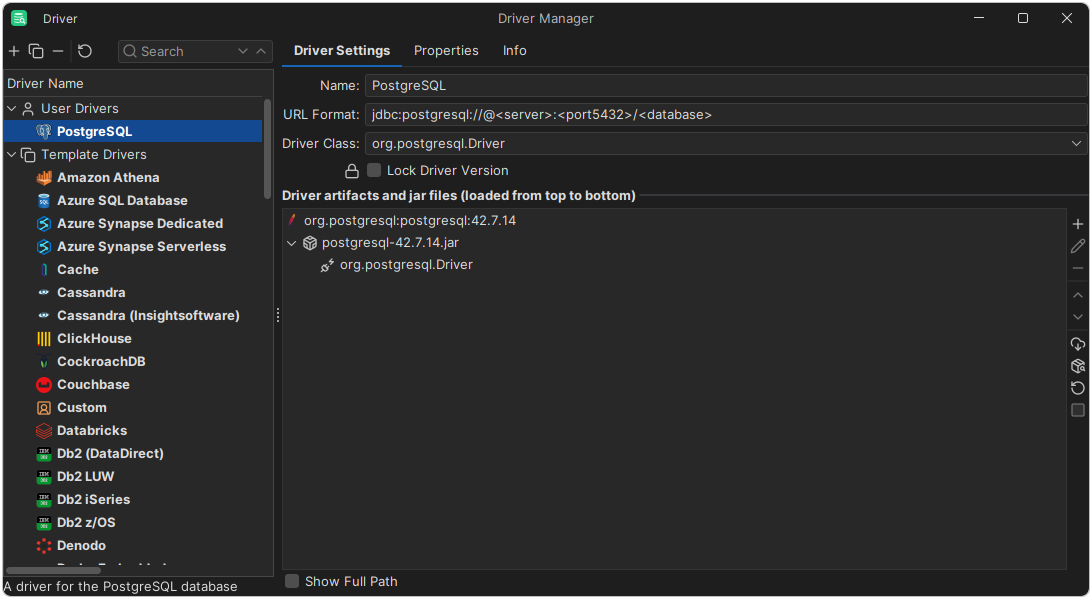
The list on the left contains two kinds of drivers:
- User Drivers are the drivers you use in your connections.
- Template Drivers are read-only templates that you create user drivers from. Templates may be updated in new versions of DbVisualizer, but your user drivers are not changed.
The Status column shows a green check icon for drivers that are ready to use, and a red exclamation icon for drivers with errors, such as a failed download or a missing file. Drivers that are not ready yet have no icon. The list also shows the version of each driver, whether updates are available, and the number of connections that use it.
Use the toolbar above the list to manage user drivers:
- Create User Driver from Template
- Duplicate Driver
- Delete Driver
- Reset Driver resets a user driver to its template.
The right part of the Driver Manager shows the selected driver. The area at the top shows the state of the driver and what to do next if it's not ready to use, for example a link to start the download. Below it are three tabs:
- Driver Settings, described in the Driver settings section below.
- Properties, the driver properties that all connections using the driver inherit. You can override them for individual connections.
- Info, general information about the driver.
Creating a user driver
To create a user driver:
- Select a template for your database in the list, or the Custom template if there is no matching template.
- Click Create User Driver from Template. You can also copy an existing user driver with Duplicate Driver.
- If the template doesn't already define the driver files, add them in the Driver artifacts and jar files tree, as described below.
- If the files need to be downloaded, click Download Driver (cloud icon) to the right of the tree.
Once the files are downloaded or added, DbVisualizer scans them for driver classes. If the scan doesn't start, click Scan for Driver Classes. When a driver class has been found, the driver is ready to use and you can create a connection with it.
Adding driver files
To add driver files, click Add Driver Artifacts to the right of the tree and select one of:
- Add Maven Artifact, a driver published in a Maven repository. This is the preferred option.
- Add Remote URL, a driver file that can be downloaded over HTTP. ZIP files are unpacked automatically after the download.
- Add Files, driver files or a folder on your computer.
You can also drag and drop, or copy and paste, files, folders, URLs or Maven dependencies into the tree. For example, copy the dependency of a driver from a Maven repository website, such as the one below, and paste it into the tree. DbVisualizer adds it as a Maven artifact with the group ID, artifact ID and version from the dependency.
<dependency>
    <groupId>org.postgresql</groupId>
    <artifactId>postgresql</artifactId>
    <version>42.7.14</version>
</dependency>
When you add or edit a Maven artifact, you can select from the available versions. You can also give an artifact a name and a description.
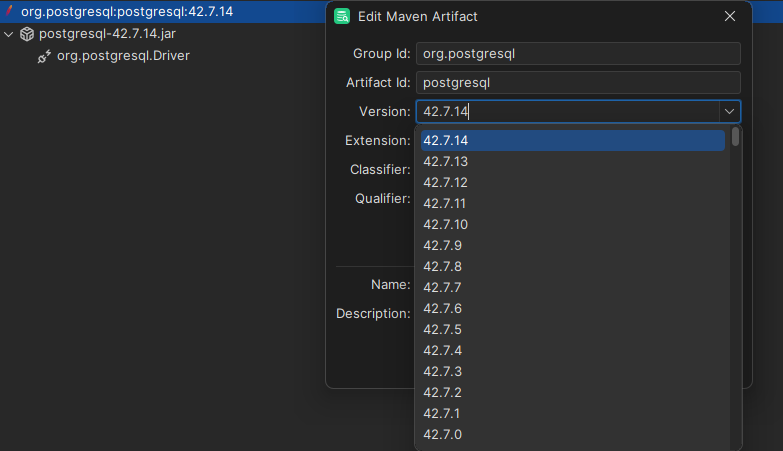
Some drivers consist of several JAR files. Select all of them at once when you add them, and DbVisualizer scans each of them for driver classes.
When you add a folder with Add Files, you choose how to use it:
- Jar Files adds the JAR files in the folder. This is what you need in most cases.
- Add Folders adds the folder itself to the driver's classpath. Use this if the driver consists of unpacked class files, or needs other files in the same folder, such as an authentication file.
When you drag and drop a folder, DbVisualizer chooses Jar Files if the folder contains JAR files.
An artifact can be set as inactive, so that it's not downloaded or used. Templates use this for artifacts that are only needed in special cases, for example to enable additional authentication methods. To activate or deactivate an artifact, right-click it and select Activate. Inactive artifacts are shown in italics:
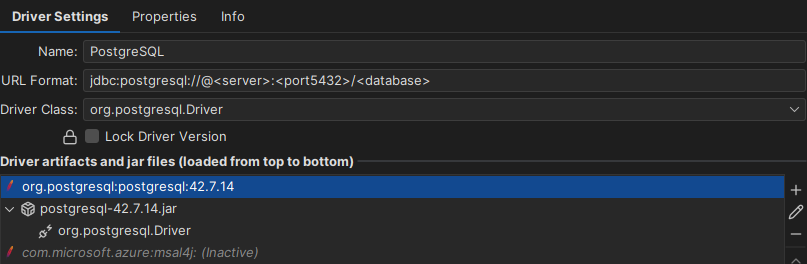
A file shown in red can't be found, for example because it has been moved or deleted. Delete it from the tree and add it again from its new location.
Driver settings
The Driver Settings tab contains:
- Name. The name of the driver, shown when you select a driver for a connection. The name must be unique.
- URL Format. The format of the connection URL, used to help you enter the connection details. See Using Variables in Connection Fields to learn how to add your own fields. For a custom driver, the URL format is used to configure the connection.
- Driver Class. The main class of the driver, used to connect to the database. If the scan finds more than one driver class, check the driver documentation to find out which one to select.
- Lock Driver Version. Keeps the driver at its current version. DbVisualizer doesn't offer updates for the driver or show notifications about them. You can still change artifact versions manually.
- Driver artifacts and jar files. The Maven artifacts, remote URLs, and files that make up the driver. The files are loaded from top to bottom, so if the same class exists in more than one file, the topmost one is used. Use Move Up and Move Down to change the order.
Updating drivers
When a newer version of a user driver is available, it's shown in the Updates column, and DbVisualizer shows a notification. To update a driver, right-click it and select Update Driver. To update all drivers that have newer versions, select Driver → Update All.
You don't need to open the Driver Manager to update the driver of a connection. When an update is available, the Connection tab of the connection shows a message with a link to update the driver.
To prevent a driver from being updated, select Lock Driver Version in its settings.
Using several versions of the same driver
You can use several versions of the same driver at the same time. Create one user driver per version and give each a name that includes the version, for example Oracle 23.4 and Oracle 19.3. To keep each driver at its version, select Lock Driver Version in its settings. Otherwise, DbVisualizer offers to update the drivers to the latest version.
Using drivers depending on native API (type 2 JDBC driver)
Type 2 drivers, such as the Oracle OCI driver, need native libraries in addition to the driver JAR files. You usually have to make these libraries available outside DbVisualizer, for example using LD_LIBRARY_PATH or other environment variables required by the driver. When there is a type 4 driver for your database, use it instead, for example the Oracle Thin driver rather than the Oracle OCI driver.
Changes to drivers with native libraries require a restart of DbVisualizer to take effect.
Maven repositories
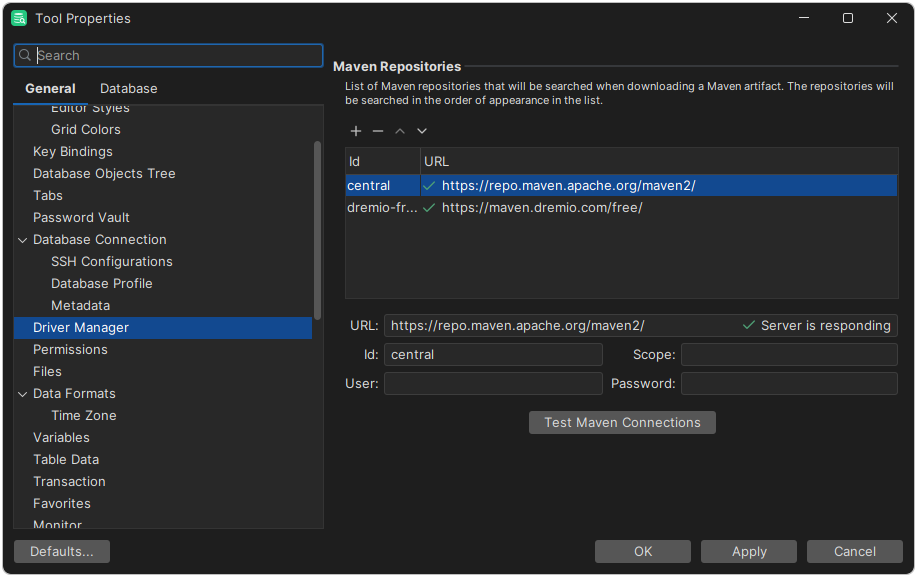
To download a driver from a Maven repository, DbVisualizer needs its group ID, artifact ID and version. Templates come with predefined Maven artifacts, and DbVisualizer comes with the URLs of common Maven repositories.
To manage the repositories, open Tools → Tool Properties and select the General / Driver Manager category. You can add, remove and reorder repositories, and enter login credentials for repositories that require them. Repositories are searched from top to bottom. To use a repository only for some artifacts, enter a group ID prefix as its Scope.
Offline use
To use Maven-based drivers without access to public repositories, you can replace the default repositories with your own repository. If you don't have one, or need to use DbVisualizer offline, you can prepare the driver artifacts and distribute them to your users:
- Open a new, empty workspace.
- In the Driver Manager, create user drivers for the drivers you need and download their artifacts.
- Copy the
driversfolder from the workspace folder. This is the package you distribute. - Copy the
driversfolder to the workspace folder of each user.
When a user creates a driver, the pre-packaged artifacts are used where possible.