Altering a Table
Only in DbVisualizer Pro
This feature is only available in the DbVisualizer Pro edition.
Using the Alter Table dialog, you change a table without writing SQL. You change the columns, keys and constraints in tabs, and the dialog writes the ALTER TABLE statements.
- In the Databases tab, right-click the table and select Alter Table.
- Make your changes, as described below.
- Click Execute.
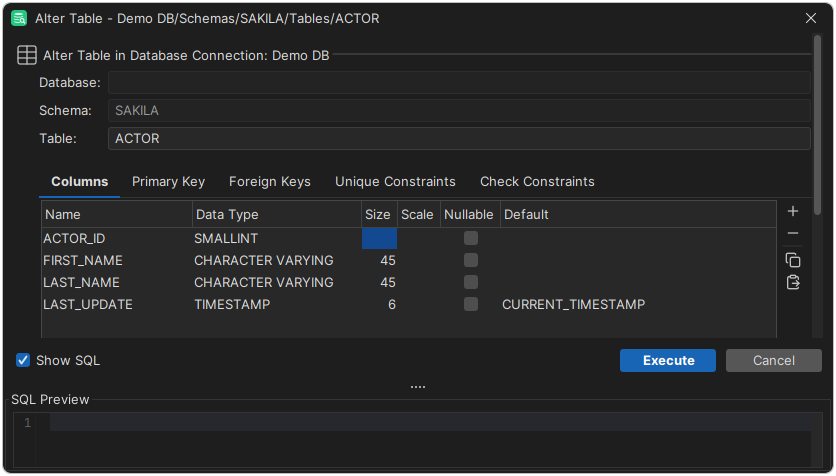
The Columns tab is there for all databases. The other tabs, such as Primary Key and Foreign Keys, depend on what the database supports.
A field is only enabled if the database can change it using ALTER TABLE. For example, if the database only allows changing the size of VARCHAR columns, Size is disabled for columns of other types. If you can't make a change, the database doesn't allow it.
Columns
The Columns tab lists the columns of the table and their attributes. Some databases have more attributes. For example, for Oracle and MariaDB, there is an attribute for invisible columns.

To add a column:
- Click Insert New Row.
- Enter the name of the column, and select a data type. To find the type, start typing its name, and press
Enterto select it. The list has all data types that the database supports. - For some data types, enter the size, such as the maximum length of a text. For decimal types, you can also enter the scale, the number of decimals.
- Choose whether the column can be null, and enter a default value for rows that are inserted without a value for the column.
Depending on the database and the data type, there are more fields. For text columns, Collation is shown if the database supports collations:

If the database can fill in values automatically, for example the next number of a sequence, there are settings for generated values:

The dialog only enables the fields that apply to the data type, as far as the database metadata tells. For example, the metadata doesn't say whether a data type needs a size. If a value is missing or isn't allowed, you get an error when you click Execute.
To remove a column, select it and click Delete Selected Row. In Create Table, you can also change the order of the columns using Move Up and Move Down.
Primary key
A primary key is a column, or a combination of columns, that identifies each row of the table.
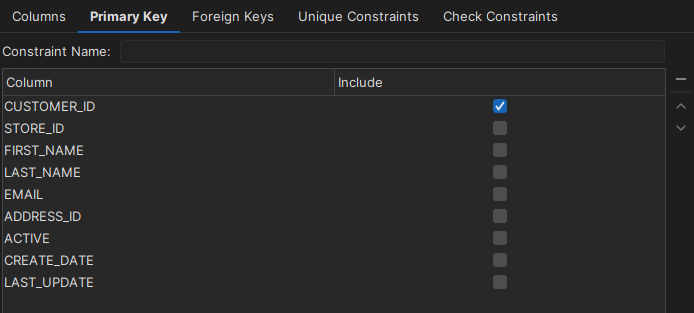
To set the primary key, select the columns in the Include column of the list. You can also enter a Constraint Name.
Foreign keys
A foreign key is a column, or a combination of columns, that refers to the primary key of another table. The database uses it to make sure that the referenced row exists. You can also choose what happens when the referenced row is deleted or its key is changed.

To add a foreign key:
- Click Insert New Row next to the list of foreign keys.
- Optionally, enter a name for the foreign key.
- Choose the On Delete and On Update actions, such as
CASCADE,RESTRICT,NO ACTIONorSET NULL. The list has the actions that the database supports. - Under Referenced Table, select the table that the foreign key refers to.
- In the list of columns, select Include for each column in the key, and select the matching Referenced Column. The Columns field of the foreign key is filled in automatically.
To change the order of the columns in the key, use Move Up and Move Down. To remove a foreign key, select it and click Delete Selected Row.
Unique constraints
A unique constraint makes sure that the values in its columns are unique in the table. The tab is only shown for databases that support unique constraints.

To add a unique constraint, click Insert New Row, optionally enter a Constraint Name, and select Include for its columns in the list below. To change the order of the columns, use Move Up and Move Down. To remove a constraint, select it and click Delete Selected Row.
Check constraints
A check constraint is a condition that a row must meet when it is inserted or changed. The tab is only shown for databases that support check constraints. Some databases use check constraints for columns that can't be null, so when you alter a table, you may see check constraints that you didn't create.

To add a check constraint, click Insert New Row, optionally enter a Constraint Name, and enter the Condition, as in a WHERE clause. To remove a constraint, select it and click Delete Selected Row.
Indexes (MySQL and MariaDB)
For MySQL and MariaDB, the Indexes tab replaces the Unique Constraints tab, since a CREATE TABLE statement can declare both unique and other indexes.

To add an index, click Insert New Row, optionally enter a name, select Unique if the values must be unique, and select Include for its columns in the list below. To change the order of the columns, use Move Up and Move Down. To remove an index, select it and click Delete Selected Row.
Previewing the SQL
To see the SQL that the dialog will execute, select Show SQL. The SQL Preview is updated as you make changes. You can't edit it, but you can copy the SQL to SQL Commander, and switch between formatted and unformatted SQL, using the right-click menu of the preview.