Importing Table Data
Only in DbVisualizer Pro
This feature is only available in the DbVisualizer Pro edition.
Using the Import Table Data wizard, you import data from a CSV or Excel file (.xlsx or .xls) into an existing table, or into a new table that the wizard creates.
- In the Databases tab, right-click the table to import to, or the Tables node to import to a new table, and select Import Table Data. You can also drag the file from your file browser to the table or the Tables node.
- Select the file. For an Excel file, also select the sheet.
- Set how to read the file, see Reading the file.
- Check the data type of each column, see Choosing the data types.
- Set up the table to import to, see Importing to an existing table or Importing to a new table.
- On the last page, check the import settings, and click Import. See Running the import.
Reading the file
On the File Format page, you set how to read the file, for example which row to start from and whether to skip empty rows.
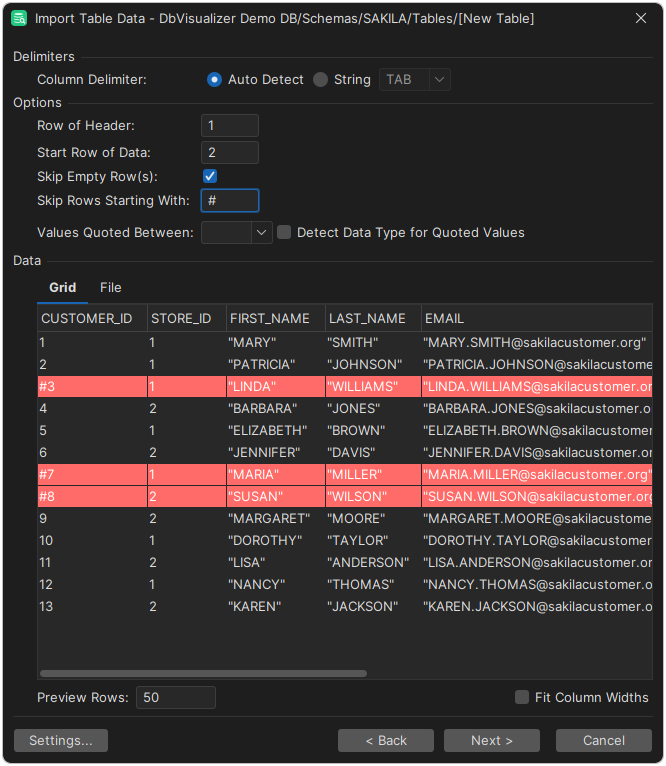
For a CSV file:
- Under Delimiters, set the character that separates the columns. With Auto Detect, DbVisualizer looks for a comma, a tab, a semicolon,
%or|. You can also type the delimiter yourself, for example a Unicode code point such as\u2656. A delimiter can be at most four characters. - Under Options, set more details, for example to skip rows that start with a comment string, or to remove the quotes around text values. If Values Quoted Between is empty, the values are imported as they are, which can go wrong if a text contains the delimiter.
- With Detect Data Type for Quoted Values, the data type of quoted values is also detected, so
"1"becomes a number instead of a string.
The Data area shows a preview: the parsed data in the Grid tab and the file itself in the File tab. A red row in the Grid tab is skipped, because of the options.
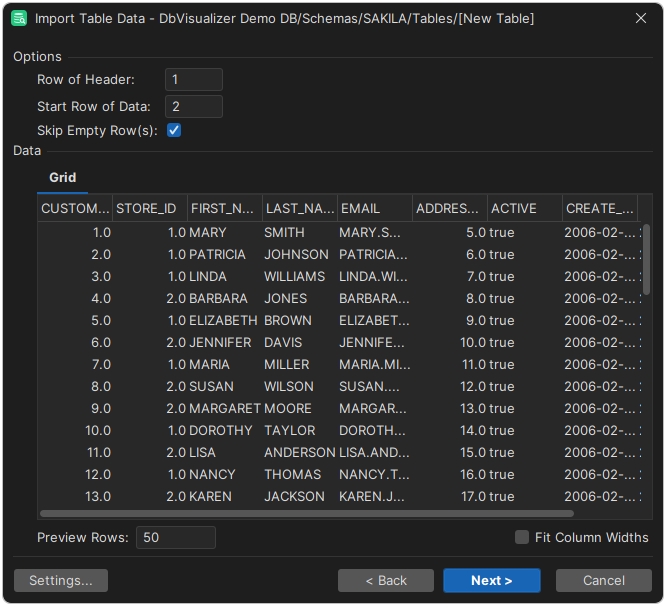
An Excel file is already in rows and columns, so there are no delimiters, and Skip Rows Starting With and Values Quoted Between aren't available. There is no File tab.
Choosing the data types
On the Data Formats page, you set the formats of some data types, and check the data type of each column. DbVisualizer guesses the type of each column from the number of rows set in Preview Rows. If a type is wrong, select another one in the first row of the preview.
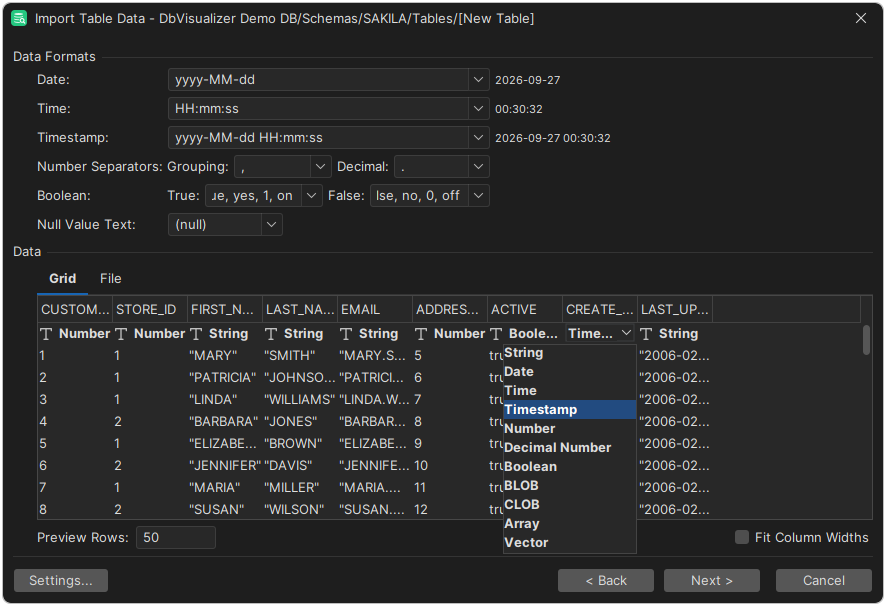
To change the type of many columns at once, for example to String, change it for one column, copy it, select the types of the other columns and paste. To let DbVisualizer guess the types again, change Preview Rows.
Importing to an existing table
On the Import Destination page, select Current Database Table. The page shows the columns of the table and the file columns they get their data from.
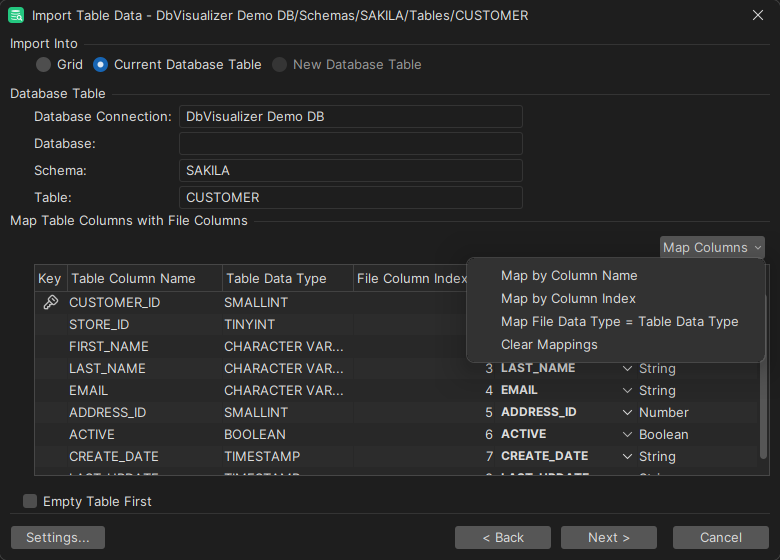
By default, the file columns are matched to the table columns in order. To match them another way, use the menu in the upper right corner of the grid:
- Map by Column Name and Map by Column Index match the columns by name or by position.
- Map File Data Type = Table Data Type sets the file data type of each column to the type of the table column.
To match a column by hand, select the file column in File Column Name. To skip a column, select the empty choice.
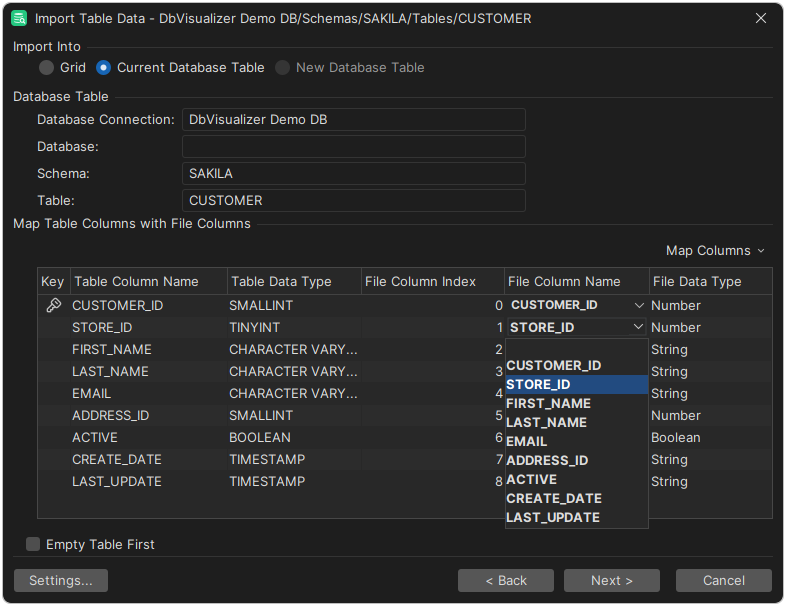
To fill in many cells of File Column Name or File Data Type at once, copy and paste the values.
At the bottom of the page, there is one more option:
- Empty Table First removes the rows of the table before the import. If the database supports it, choose TRUNCATE or Delete. TRUNCATE is usually faster.
To look at the data without saving it in the database, select Grid instead. The data opens in a grid in a window of its own, where you can format, filter and export it.
Importing to a new table
On the Import Destination page, select New Database Table, and enter the name of the table. The tabs below work like in Create Table. The Columns tab is filled in from the file and the data types you chose.
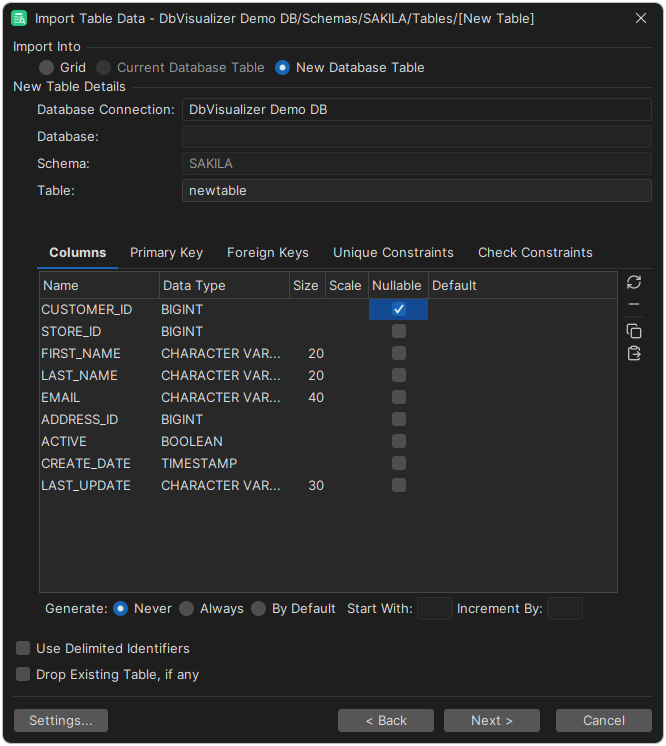
- Not all data types can be matched to a type in the database. Then select the type in Data Type yourself.
- The size of text columns is the longest value in the Preview Rows, rounded up to the next multiple of ten. Change it if needed. To get better sizes, go back, increase Preview Rows, and click Reload when you return to this page.
- To skip a column, remove it in the Columns tab. Add keys and constraints in the other tabs.
- Use Delimited Identifiers puts quotes around the table and column names in the SQL.
If the import fails, the table may already have been created. Before you try again, select Drop Existing Table, if any. It's off by default, so that you don't drop an existing table by mistake.
To look at the data without saving it in the database, select Grid instead.
Importing BLOB and CLOB data
You can import BLOB and CLOB data that you have exported with DbVisualizer:
- From a CSV file: use the wizard, and set the format of the column to BLOB or CLOB on the Data Formats page.
- From an SQL script: run the script in SQL Commander. When a value is a variable that refers to a file, the content of the file is inserted.
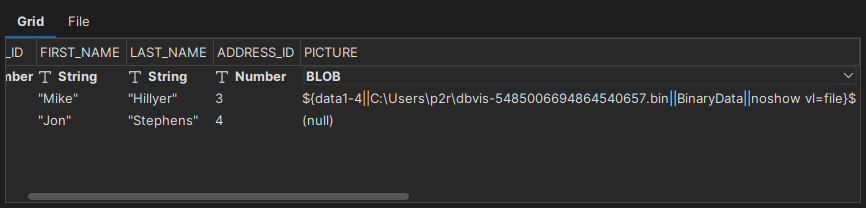
Excel files can't hold BLOB or CLOB data, and such cells are imported as empty.
Running the import
The last page has these settings:
- Import All rows or Import: Import all rows, or only a number of them.
- Single Inserts: Insert one row at a time, and commit after the number of rows set in commit interval.
- Batch Import: Insert the rows in batches, with a commit after each batch, which can be much faster. Set the size in rows per batch/commit. Not all databases and drivers support it equally well.
- Keep Window After import: Keep the wizard open after the import. If the import fails, it is always kept open.
- Stop On Error: Stop the import at the first error.
Saving the settings
If you often use the same settings, save them, using the Settings menu button:
- Save As Default Settings: Use the current settings as the defaults the next time you open the wizard.
- Load Default Settings: Go back to the saved default settings.
- Remove Default Settings: Remove the saved defaults, and go back to the original defaults.
- Save As and Load: Save the settings to a file, and load them from a file.
Other ways to import
- Run a script with
INSERTstatements in SQL Commander. - Use the @import command in SQL Commander or in the command-line interface.
- For MySQL, MariaDB and SingleStore, use
LOAD DATAfor a fast import from a local or server file: right-click the table and select Import Table Data → Load Table Data. It needs a driver property, and may need privileges on the server.
Limitations
- Excel files with the
.xlsextension can be at most about 20 MB, depending on how much memory DbVisualizer has. Giving DbVisualizer more memory may let you import larger files.